
This is a quick guide to changing the pollen filter on a 2006 VW Caddy. The filter is located under the passenger side glove box and is accessed from beneath the dash - no tools needed on most versions of this van.
Why Change Your Pollen Filter?
On the VW Caddy the pollen filter, sometimes called the cabin or air-conditioning filter, sits behind the dashboard and cleans every bit of air drawn into the cab through the heater and vents. In a working van that air is often full of site dust, diesel fumes from loading bays, and pollen, so the filter has a harder life than it would in a family car.
A choked filter does more than spoil the air you breathe. It throttles airflow through the whole heater box, so the Caddy's blower has to strain, the screen takes longer to demist on cold mornings, and the air conditioning feels weak. Vans that have covered big miles on an original filter often transform after a fresh one goes in - far stronger airflow and no stale smell at start-up.
Signs Your Pollen Filter Needs Replacing
- Reduced airflow from the vents even at full fan speed
- Musty or unpleasant smell when the heater or AC is switched on
- Increased allergy symptoms - itchy eyes or nose while driving
- Windscreen takes noticeably longer to demist than it used to
- Fan sounds louder than normal - working harder against the restriction
- Unable to confirm the filter has been changed in the last 12–15,000 miles
How Often Should You Change It?
VW's guidance is roughly every 12–15,000 miles or once a year, whichever comes first, but a Caddy used for deliveries or on building sites will clog its filter long before a car would. Plenty of vans never get the filter touched because it is quietly dropped from the service to trim the bill, so if you have bought a used Caddy with patchy history, fit a new one straight away.
Drive the van mostly in town, around sites, or sat in traffic with the fans running and you should change the filter every year regardless of the odometer. Stop-start urban and site work pulls in far more soot and dust than steady motorway miles, and that shortens filter life considerably.
Standard vs Activated Carbon Filters
Two filter types fit the Caddy. A plain particle filter uses pleated paper or synthetic media to catch dust and pollen and matches the basic OEM part. A carbon version adds a charcoal layer that also soaks up exhaust gases and smells, which is well worth having if you sit in traffic or load near running engines. It costs a little more but the difference in cab air is noticeable, especially on a higher-mileage van.
Step-by-Step Guide
Shop Parts & Tools for This Job
As an Amazon Associate, Mr Auto Fixer earns from qualifying purchases. Prices and availability may vary.
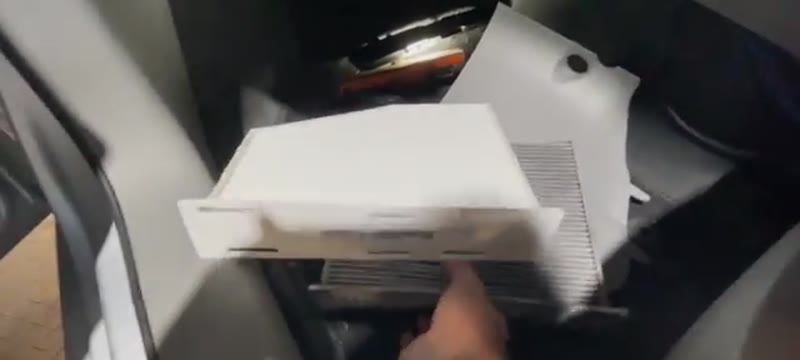
Access Under the Passenger Side Glove Box
Open the passenger door and crouch or kneel to look under the glove box. You will see a black plastic cover just below the dash. Place your hand on it and pull it off - it just pulls free to reveal plenty of space underneath.

Slide the Filter Cover Off
Inside the space there is a black filter cover. Slide it sideways to the left to release it from its retaining hooks, then pull it down and out. On reassembly you slide it back in to the right until the hooks locate.

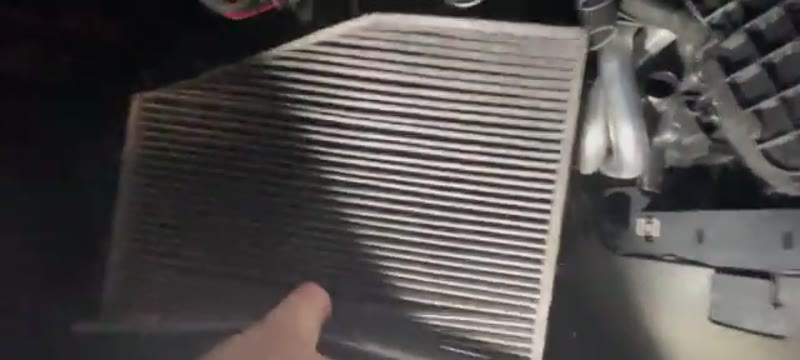
Remove the Old Filter
The pollen filter pulls straight out once the cover is off. Note which way around it sits and check the airflow direction arrow. Take a photo if it helps. Dispose of the old filter - it will likely be full of dust, pollen and debris.
Fit the New Filter
Fit the new filter in the same orientation as the old one, with the airflow arrow pointing in the correct direction. Push it fully into the housing so it seats squarely.
Refit Cover & Panel
Slide the filter cover back into its hooks by going in at an angle and sliding it to the right until it locks. Refit the lower trim panel by pressing the lugs home and sliding it around until all the clips engage. Done - under five minutes start to finish.

Want this guide offline - and 15 more like it?
Our PDF guide collection covers servicing, fault codes, buying a used car and more. Written by a qualified mechanic. Download once, use forever - no ads, no internet needed.
The Caddy's filter change is the fastest on this site - a slide-off cover under the glove box, no tools, under five minutes - and yet working Caddys routinely run filters that are years old, because a van that earns its living gets oil and brakes, not "extras". The economics say otherwise: the driver breathes through this £10 element all working day, and a Caddy's working environment (depots, town queues, site visits) loads a filter noticeably faster than car duty. Annually at minimum; every six months if the van works around dust.
VW Dealer vs DIY Cost
| Who does it | Typical price | What you get |
|---|---|---|
| VW Van Centre | £40–£80 | Genuine filter, booked slot, van off the road |
| Independent garage | £20–£50 | Same job in passing - if you remember to ask |
| DIY | £8–£15 | Quality filter, zero tools, under five minutes |
Typical UK prices for the 2006-era Caddy. There is no cheaper labour saving anywhere in van ownership - the job takes less time than the tea break.
The VW Group Parts Bin Works in Your Favour
This Caddy is a Golf Mk5 underneath, and its filter is shared across half the VW Group of the era - Golf, Touran, Jetta, A3 - which means enormous aftermarket supply and honest prices. Mann and Mahle, who make VW's originals, list it at £8–£15 in their own boxes. The carbon version costs £4–£6 more and absorbs diesel fumes, which a van in traffic collects all day; for a working Caddy it is the better grade. Any motor factor in the country has this filter on the shelf.
Related Checks for a Working Caddy
If the cab still smells musty after the new element, an evaporator aerosol treatment through the intake finishes the job. A blower that has lost speeds is the resistor pack, not the filter. And on Caddys of this age, check the scuttle drains while you are near them - packed leaves send rainwater into the cab, and a damp van cab never dries out in a British winter.
For the Caddy's bigger van-life jobs, the Transporter EGR guide shows what the same-era VW diesels eventually need, and the symptom finder handles any cab symptom the filter does not explain.
<Job Summary
Common Mistakes to Avoid
The mistake fitters make most often is putting the filter in upside down. Look for the airflow arrow on the edge of the new filter and make sure it points the way air travels into the cab. In backwards, it filters poorly and the media can eventually collapse against the housing.
The other common slip is not clipping the cover home properly. On the Caddy a loose cover shows up as a whistle or rush of air from behind the dash and weaker flow at the vents. Press the cover firmly and check every clip has engaged before you call the job done.
Frequently Asked Questions
Will changing the pollen filter improve my air conditioning performance?
Yes, and often a lot. A blocked filter strangles the volume of air the Caddy's system can move, so the cab takes longer to cool or warm. Before assuming the air conditioning needs regassing, fit a fresh filter - on a neglected van the gain in airflow alone can be dramatic.
Can I just clean and reuse the old filter?
No, not really. Some drivers knock the dust out or blow a filter through to buy time, but the media holds fine particles, fumes, and damp that simply cannot be cleaned out. Filters are cheap enough that a working van deserves a new one rather than a tired, contaminated reused element.
My car doesn't have air conditioning - does it still need a pollen filter?
Yes. The pollen filter serves the fresh-air ventilation, not the air conditioning, so even a Caddy without AC draws cab air through it. A blocked filter still leaves you with feeble vents and can let mould grow in the ducting, so it needs changing on the same schedule whether or not the van has air conditioning.
What happens if I leave a blocked pollen filter in too long?
Left long enough, a packed filter makes the blower motor labour, which shortens its life and is an expensive fix in a van that earns its keep. A damp, clogged filter also breeds mould and bacteria in the heater box, leaving a musty smell that is hard to shift without stripping the box out - far dearer than the few minutes a filter change takes.