
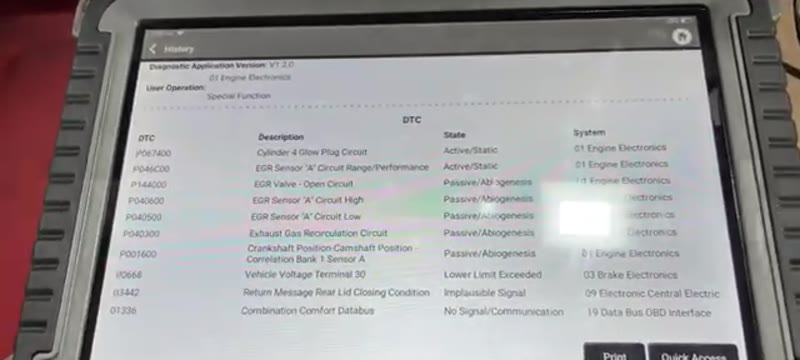
The engine management light is on and the glow plug light is flashing on this 2010 VW Transporter. A code scan reveals multiple EGR sensor faults - and crucially, the codes keep coming back after being cleared. This points directly to a coked up or faulty EGR valve and cooler assembly.
On VW Transporters this is a very common fault. The EGR system recirculates exhaust gases back into the engine to reduce emissions, but over time the valve and cooler become heavily coked up with carbon deposits, causing it to stick open or closed and trigger fault codes.
Classic Symptoms to Watch For
- Engine management light on
- Glow plug warning light flashing
- Multiple EGR sensor fault codes on scan
- Codes return immediately after being cleared
- Possible rough running or loss of power
- Possible black smoke from exhaust
Fault Codes Associated with This Fault
Tools You'll Need
Step-by-Step Guide
Scan for Fault Codes First
Before touching anything, plug in your diagnostic tool and do a full code scan. On this Transporter you'll likely see multiple EGR sensor related codes. Clear them and see which ones immediately return - those are your active faults and confirm the EGR is the culprit rather than a one-off glitch.
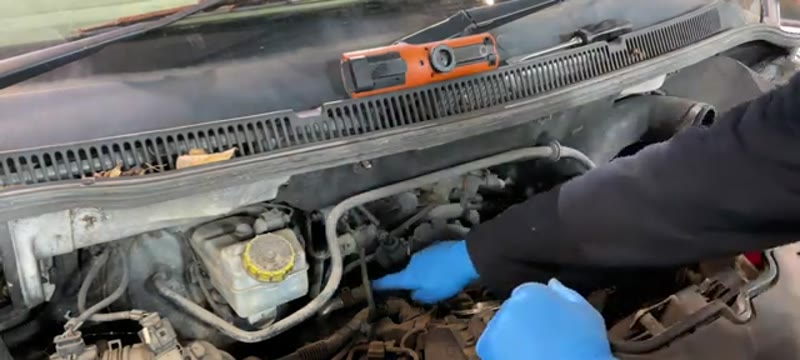
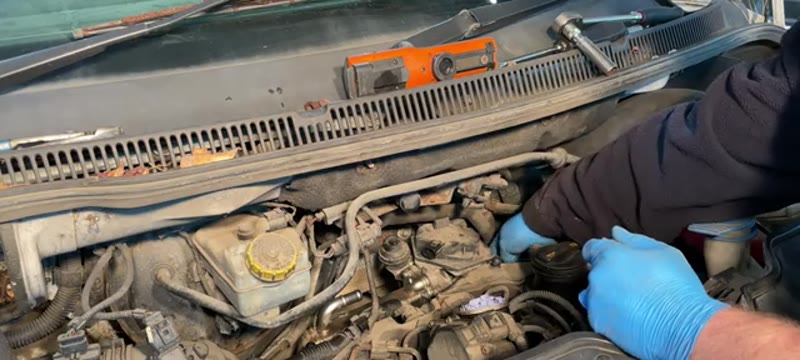
Remove the Large Intake Pipe
The EGR valve and cooler assembly is located on the engine with the electrical connector visible from above. Start by undoing the jubilee clip on the large intake pipe that wraps around in front of it. Once the clip is loose, fold the pipe out to the side to give yourself clear access to the top of the EGR and EGR cooler.

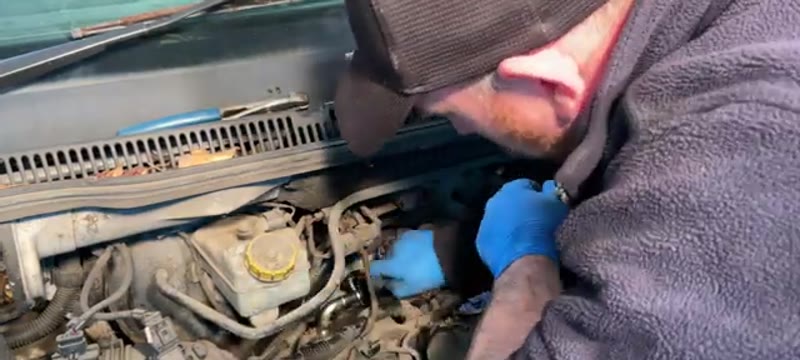
Disconnect Electrical, Vacuum & Coolant Connections
With the intake pipe out of the way, disconnect the electrical connector from the EGR valve. Then remove the top coolant hose from the EGR cooler and the vacuum line. Be ready for some coolant to spill when the hose comes off - clamp the pipe first if you have hose clamp pliers to minimise coolant loss. Tuck everything out of the way.
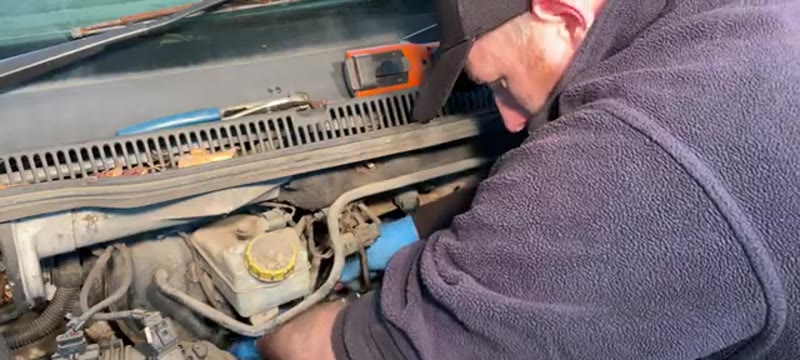
Remove the Flexi Pipe Bolts at the Back (2x 12mm)
At the rear of the EGR there's a flexi pipe secured by two 12mm nuts - these are notoriously tight. Start with a quarter drive ratchet and if they won't budge, move up to a 3/8 drive on a long extension to get enough leverage to crack them free. Once broken loose they undo easily. Leave the flexi pipe attached to the EGR for now - you'll separate it on the bench.
Remove the Side Torx Bolts (2x T30)
Move to the side of the EGR valve and remove the two T30 Torx bolts going in towards the engine. These are more accessible than the rear bolts and should come out without too much trouble.
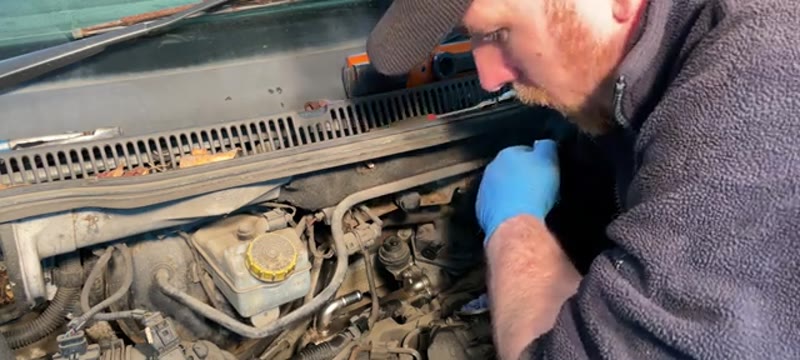
Disconnect the Right Hand Side Pipes (T30 & T20)
On the right hand side of the engine there's a flexi pipe and a water pipe. The flexi pipe bolts are T30 Torx, but note that the water pipe bolt is a slightly smaller T20 Torx. Once undone, push the water pipe back and tuck it out of the way. You can now get your hand down the back of the unit.
Remove the Final Two Rear Torx Bolts (2x T30)
There are two final T30 Torx bolts at the very back - you can't see them easily from above. Use an inspection mirror or simply feel for them with your hand. Once these are out the entire EGR valve and cooler assembly should be completely free and can be carefully worked out of the engine bay.
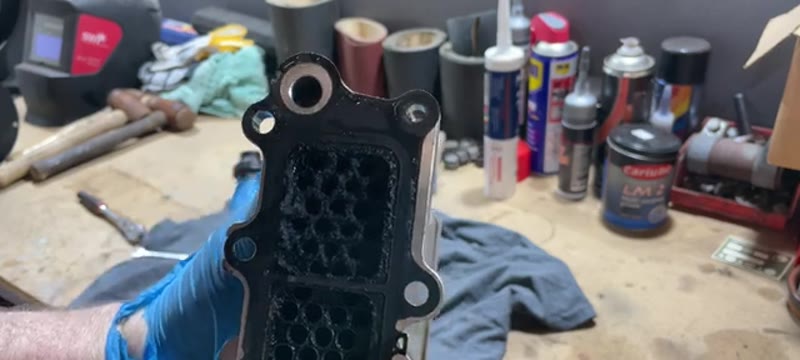
Inspect & Clean the EGR Valve and Cooler
With the unit on the bench, separate the EGR cooler from the valve by undoing the 8mm bolts - use a spanner on any you can't get a socket onto. Once apart you'll likely see heavy carbon build-up inside the cooler passages and on the valve plunger shaft. This is what's preventing the valve from seating properly in the open or closed position.
Apply EGR or carburettor cleaner spray and allow it to soak. Clean as thoroughly as possible. However be aware that on heavily blocked units, getting them fully clean all the way through is very difficult - if the codes return after refitting, the recommendation is to replace the whole unit rather than continuing to clean.
Refit & Run EGR Adaptations
Refit in the reverse order of removal. Make sure all gaskets are in place and everything is torqued up properly - especially the coolant connections. Once refitted, use your diagnostic tool to run the EGR adaptations/relearn procedure for the new or cleaned valve. This is essential - skipping it will likely result in fault codes returning even on a perfectly good unit. Run a full test drive and re-scan to confirm the fault is cleared.
Parts & Tools for This Job
As an Amazon Associate, Mr Auto Fixer earns from qualifying purchases. Prices and availability may vary.
Want this guide offline - and 15 more like it?
Our PDF guide collection covers servicing, fault codes, buying a used car and more. Written by a qualified mechanic. Download once, use forever - no ads, no internet needed.
Why the T5's EGR Clogs - and Why Cleaning Is Often Enough
The T5 Transporter's EGR valve does the dirtiest job on the van: recirculating hot exhaust, laced with oily breather vapour, into the intake. The blend bakes into carbon that progressively jams the valve - and the T5's typical life of short hops between jobs is exactly the duty that never gets the exhaust hot enough to self-clean. Expect trouble anywhere from 70,000 miles on an urban van: hesitation at low revs, rough idle, black smoke on pull-away, and eventually the engine light with limp mode.
The good news specific to this engine: the T5's valve responds well to a proper clean - which is why this guide is a remove-and-clean rather than an automatic replacement. The £15 in carb cleaner against a £100–£200 valve is a worthwhile first round on a valve that still actuates.
Garage vs DIY Cost
| Who does it | Typical price | What you get |
|---|---|---|
| VW Van Centre | £350–£550 | New genuine valve - dealers do not clean, they replace |
| Independent garage | £200–£400 | New quality valve fitted; some will clean on request |
| DIY clean | £15–£30 | Carb cleaner, gaskets and 2-3 hours - the best-value outcome if the valve is sound |
| DIY replace | £100–£200 | Quality valve and gaskets when cleaning is not enough |
Typical UK prices for the T5 diesel. The clean-first approach is the honest middle path most garages skip straight past.
When Cleaning Is Not Enough (and What to Buy)
Clean and refit if: the valve moves freely once degunked and the pintle seat is intact. Replace if: the actuator is lazy on test, the seat is pitted, or the same fault returns within weeks of a good clean - a returning code means mechanical wear, not dirt. Buy Pierburg or Wahler (the OE suppliers for VAG EGRs) at £100–£200 and avoid the £40 specials, whose seats leak from new. The T5 community's hard-won rule: you clean an EGR twice at most, then you replace it.
Common Mistakes on the T5 EGR Job
- Using force on heat-seized fasteners. Everything around the EGR has been heat-cycled for fifteen years. Penetrating oil overnight, steady pressure, and never an impact gun on the manifold studs.
- Soaking the electrical actuator in cleaner. Carb cleaner is for the carbon passages and pintle - flooding the solenoid or position sensor kills the valve you were saving.
- Reusing crushed gaskets. New gaskets are £5–£10 and the old ones will leak exhaust into the engine bay - which you will smell in the cab within a mile.
- Ignoring the pipework carbon. The EGR pipe and intake elbow carry the same tar as the valve. Cleaning the valve and bolting it back onto blocked pipes halves the benefit.
- Skipping the code clear and road test. Clear the fault, then drive a proper heat cycle including motorway speed - a T5 that only ever potters will re-coke the valve you just cleaned.
Related Faults on the T5 Diesel
EGR symptoms overlap with the T5's other middle-age complaints: split intercooler and boost hoses (sudden power loss with a whoosh), a sticking turbo actuator (power fades above 3,000 rpm), and on high-milers, an intake manifold so coked it needs the same treatment as the valve. If the engine light shows boost codes rather than EGR flow codes, chase the hoses first - it is a £20 fix hiding behind a £200 assumption.
For vans on short-hop duty, the diesel DPF problems guide explains the driving habits that keep the whole soot-management system alive - the same habits that would have spared this EGR. Anything unexplained, run it through the symptom finder before buying parts.
Job Summary
What to expect on this repair: