The pollen filter on the 2021 MG ZS is accessed through the glove box which drops down by releasing two plastic tabs. No tools are required and the whole job takes under 10 minutes.
This applies to the Blueprint version of the MG ZS and is likely similar across other MG ZS variants.
When You Need This Job
Musty or stale smell from the cabin vents
Reduced airflow from the heater or air conditioning
Part of the annual service schedule
DIY vs Garage Cost - UK 2026
An independent UK garage will typically charge £30-£60 for pollen filter replacement, including parts and labour - that's usually 30 minutes of booked time even though the job itself takes around ten. A main dealer will be £55-£110 because they fit a genuine-branded part and book longer for the same work. The DIY part cost is where the saving really shows: an own-brand UK factor filter is £8-£14, a quality Bosch, Mann or Mahle is £14-£28, and a genuine OE-branded part is £25-£45. The labour on a DIY pollen filter is essentially nothing - ten minutes of careful pinching and pulling with either no tools or a single plastic trim removal tool. Honest verdict: this is the single best beginner DIY job in the UK car-maintenance world. A first-timer can do it without any mechanical experience, the worst-case scenario is having to refit it the right way round, and a quality Mann or Bosch part performs identically to original equipment for half the price.
Tools You'll Need
No tools required
Step-by-Step Guide
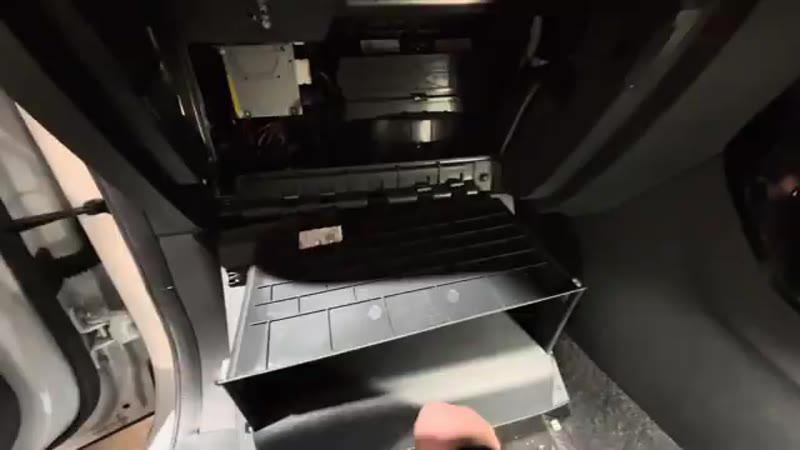
01
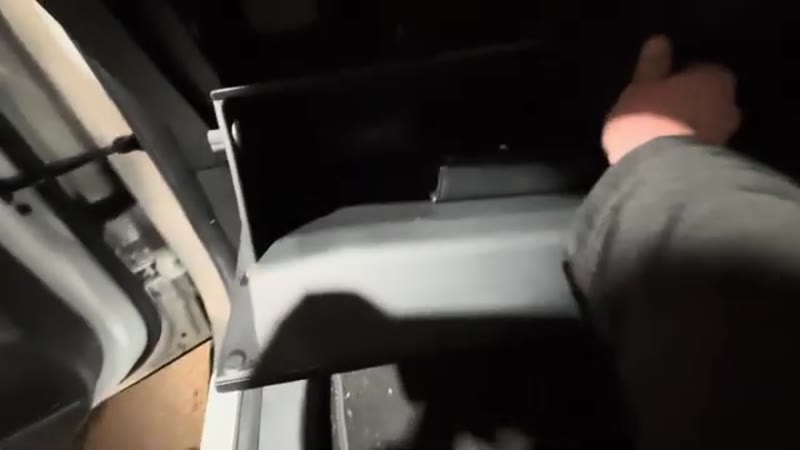
Open the glove box and locate the two tabs
Open the passenger side glove box. Inside at the top you will see two small plastic tabs - one on each side.
02
Bend both tabs inward and drop the glove box
Press both tabs inward simultaneously and the glove box will drop down fully, revealing the filter housing behind it.
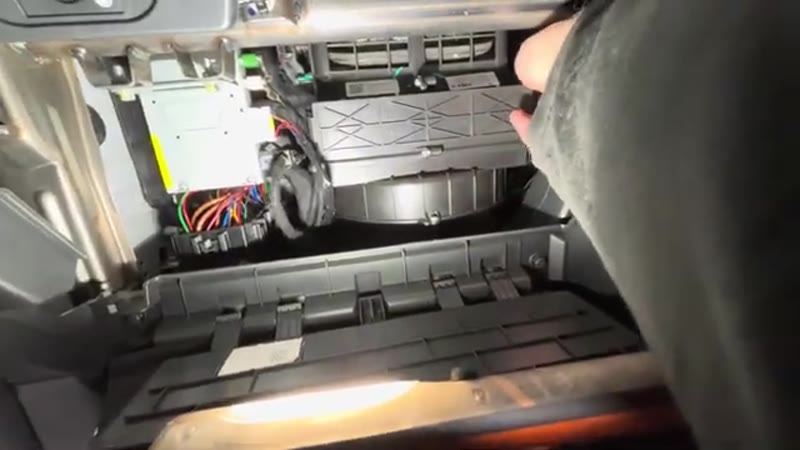
03
Release the filter housing cover
Behind the glove box you will see two small button clips on either side of the cover. Pull the tab on the side and the cover will release. Remove the cover and set aside.
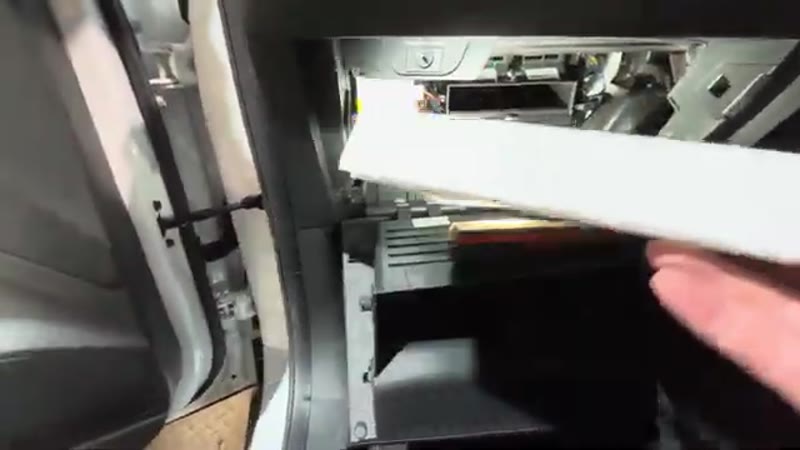
04
Note airflow direction and remove the old filter
The filter has an airflow arrow printed on it - note the direction before removing. On this model the airflow points downward.
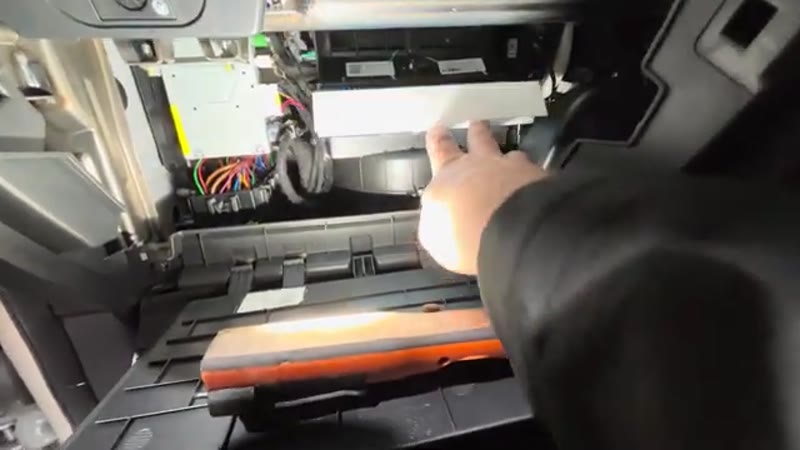
05
Fit the new filter
Slide the new filter into the housing ensuring the airflow arrow points in the same direction as the old one. Push it fully home and fold down the small flap at the front.
06
Refit the cover and glove box
Pop the cover back on ensuring it clips in on both sides - a loose cover will rattle. Press the two glove box tabs back in and push the glove box back into position.
Check airflow direction carefully
The filter must go in with the arrow pointing the correct way. Fitting it backwards reduces filtration efficiency significantly.
The mistake I see most often is fitting the new filter the wrong way round. Every cabin filter has an airflow direction arrow printed on its edge - it must point in the same direction as the old one came out. On most cars this is downwards into the heater box. If you cannot find the arrow on the new filter, lay the old one beside it: the dirty face is where the air comes in from outside, the clean face is where it goes into the cabin. Fit the new one the same orientation and you cannot get it wrong. The second-most-common mistake is pinching the foam seal between the housing and the cover during reassembly - this lets dirty air bypass the filter completely and your new filter does nothing. Pay attention as you close the housing cover, make sure the seal sits flat all the way round. On the 2021 MG ZS (both ICE and ZS EV models), the housing cover is held by two side clips that look identical but rotate in opposite directions - squeezing both inward at the same time is the only way it releases cleanly. Forcing the cover straight off without rotating the clips will crack it. Also, the MG-branded filter from the dealer is overpriced compared to a Bosch part with the same dimensions - the dealer charges 35 to 45 pounds, the Bosch is 14. Cheap unbranded filters under £8 can be slightly off-dimension and may not seat fully - stick with Bosch, Mann or Mahle for guaranteed fit. Lay the old filter and the new one side by side, fit it the same way round, click the cover home, and you are done.
Mr Auto Fixer Shop
Want this guide offline - and 15 more like it?
Our PDF guide collection covers servicing, fault codes, buying a used car and more. Written by a qualified mechanic. Download once, use forever - no ads, no internet needed.
The ZS sells on low running costs, and this job is the purest example on the car: a £10 part, no tools, and ten minutes - yet it is a line item on every service invoice. The filter itself works hard for its living, because the ZS is a town SUV by vocation and town air is dense with the soot and brake dust that load a filter fastest. Change it every twelve months regardless of how the old one looks from the edge; the felt of grime builds on the upstream face where you cannot see it. The same job and interval apply to the ZS EV - electric drivetrain, identical cabin filter arrangement behind the glove box.
Standard vs Carbon - and Whose Filter to Buy
Two grades fit the ZS: standard particulate at £8–£15 and activated carbon at £14–£25. The carbon version earns its premium in traffic, absorbing the exhaust fumes and odours that sail through a paper element - on a car that spends its life in town, it is the better buy. MG's genuine filter comes from the same OE suppliers who stock UK factors under their own names (Mann, Bosch, Mahle all list the ZS), so the branded aftermarket element at half the dealer price is the same filtration. The only filters to avoid are the unbranded flimsy-framed ones - a frame that will not hold its shape will not hold its seal.
Related Symptoms the Filter Will Not Fix
A smell that returns within days lives on the evaporator, not the filter - a £12 evaporator cleaner aerosol through the intake sorts it. Weak airflow with a new filter is a tired blower motor; a blower missing specific speeds is the resistor pack. And a windscreen that mists stubbornly with a fresh filter usually means damp carpets from blocked scuttle drains - check under the windscreen trim for packed leaves. The symptom finder walks each of these through in a minute, and the UK servicing cost guide shows what else on the ZS is this easy to do yourself.
Quick Stats
Difficulty
Easy
Vehicle
MG ZS 2021
Time
10 mins
Parts Cost
£10–£20
Common Questions
FAQ
Yes - two plastic tabs drop the ZS's glove box and the filter is straight in front of you. Under ten minutes, no tools. On a car this DIY-friendly, this is the job to start with if you have never done anything on a car before.
£20–£50 at a garage for a sub-ten-minute job; the filter is £8–£15. Doing it yourself does not affect MG's seven-year warranty either - cabin filters are an owner item.
Under ten minutes. Release the two tabs, drop the box, swap the filter arrow-matching-arrow, clip everything back. The only care point is being gentle with the plastic tabs in cold weather.
Annually, or every 12,000–15,000 miles, whichever lands first. On the ZS it is such a quick job that the interval barely matters - change it every spring and the question never comes up.
The filter housing and dimensions are identical between the MG ZS petrol and the MG ZS EV - they share the same heater and AC architecture. The part number is the same and either an MG-branded or quality aftermarket filter (Bosch, Mann) will fit both. The only practical difference is that on the EV, the cabin filter has a more noticeable effect on driving range than on the petrol, because the EV relies more heavily on heated and cooled cabin air. A clogged filter forces the climate system to work harder, draining the battery faster - so EV owners should change theirs even more diligently.
20+ Years ExperienceMOT TesterProfessional UK Mechanic
All guides on this site are written from real, hands-on experience - not copy-pasted from a manual. If I haven't done the job myself, it doesn't go on the site.