
This 2009 Audi Q5 S Line came in with the dipped beam headlight out. The Q5 at this age uses Xenon HID (High Intensity Discharge) headlights rather than standard halogen bulbs - so the bulb specification is completely different. The bulb required is a D3S 35W Xenon unit, which is more expensive than a standard halogen but straightforward to replace once the headlight is partially removed.
The headlight doesn't need to come fully out - just loosening the three T30 Torx bolts and sliding it forward slightly gives enough access to reach in and swap the bulb.
Bulb Specification - Audi Q5 2009 S Line Xenon
What You'll Need
Step-by-Step Guide
Remove the Top Plastic Panel & Clips
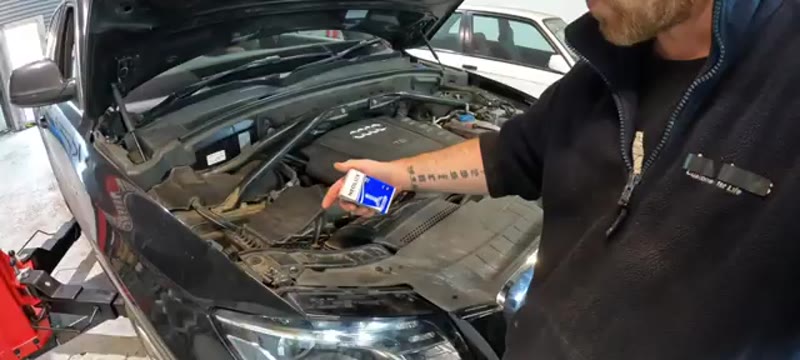
Open the bonnet. There's a plastic trim panel running along the top of the headlight area - remove the clips holding it down and lift it clear. This gives you a clear view of the headlight unit and the Torx bolts holding it in. Note that some clips may already be missing on older Q5s - replace any that are broken.
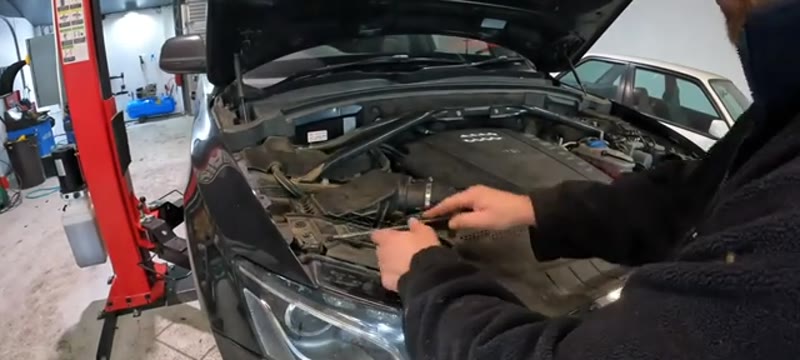
Loosen the Three T30 Torx Bolts
The headlight is secured by three T30 Torx bolts - two visible from above and one located down at the bottom rear of the headlight unit which you'll need to reach for. Undo all three. The headlight does not need to come out completely - just loosen it enough to slide it forward slightly and create access to the back of the unit.
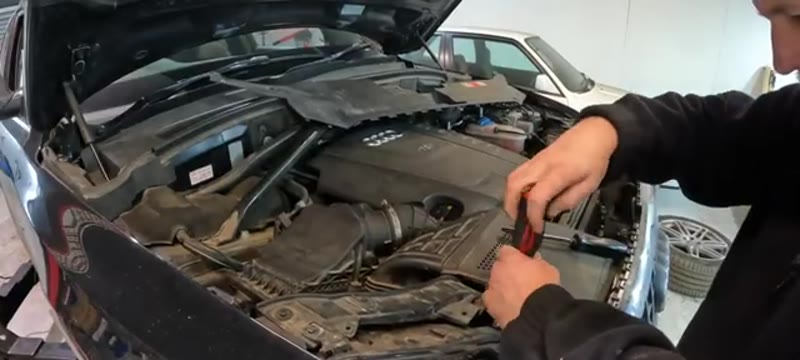
Slide the Headlight Forward & Access the Bulb
With the bolts out, carefully slide the headlight forward on its lower mounting rail - it runs on a sliding mechanism underneath so it won't come all the way out without bumper removal. You only need a few centimetres of clearance to get your hand behind it to access the bulb. There is a small rubber gasket on the side - be careful not to damage it.
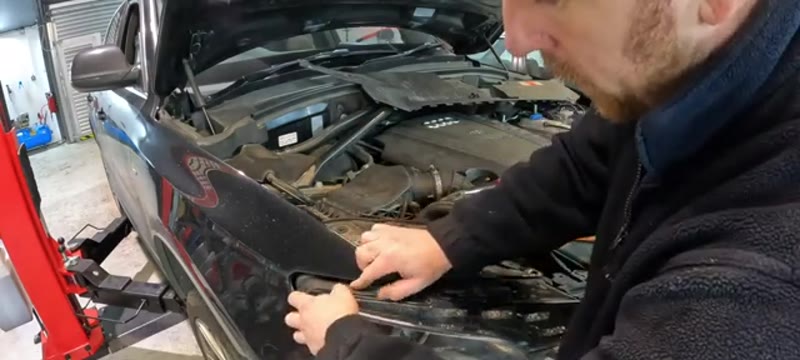
Remove the Plastic Cover & Old Bulb
Reach behind the headlight and locate the plastic bulb cover - it has a small metal clip holding it on. Ping the clip off and the cover will come away. Be careful not to drop the cover down into the bumper. Behind the cover you'll find the D3S Xenon bulb. Disconnect the plug from the bulb and pull the old bulb free - it will likely be clearly blown or discoloured.
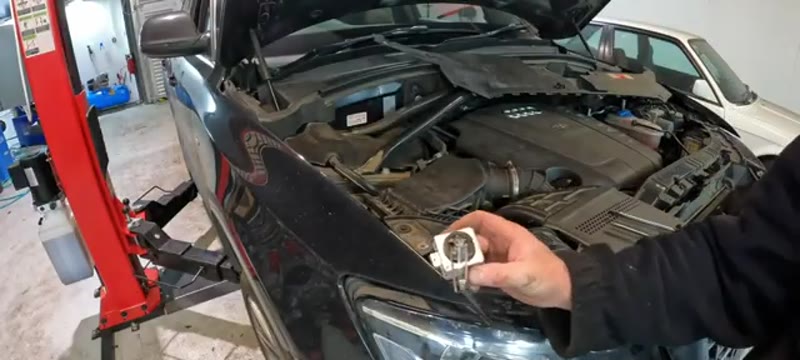
Fit the New D3S Bulb & Reassemble
Fit the new D3S 35W Xenon bulb - press it firmly into the holder and reconnect the plug securely. Refit the plastic cover and clip. Slide the headlight back into position, refit all three T30 Torx bolts and tighten down. Refit the top plastic panel and all clips. Turn the ignition on and test both headlights - both dipped beams should now be working.
Parts & Tools for This Job
As an Amazon Associate, Mr Auto Fixer earns from qualifying purchases. Prices and availability may vary.
Want this guide offline - and 15 more like it?
Our PDF guide collection covers servicing, fault codes, buying a used car and more. Written by a qualified mechanic. Download once, use forever - no ads, no internet needed.
How Xenon Bulbs Die - Slowly, Then Suddenly
A D3S xenon does not blow like a halogen. It fades: over five to eight years the arc loses intensity - up to half its original light output - and the colour drifts from crisp white toward pink or purple. Because the fade is gradual, owners never notice until an MOT tester or a dark rural road makes the point. A xenon that flickers on startup or takes several attempts to strike is in its final weeks. And because the two bulbs have aged identically, replace them as a pair: a new bulb next to a five-year-old one gives two different colours and two different ranges, which you will hate every night drive afterwards.
Dealer vs DIY Cost on a D3S Change
| Who does it | Typical price | What you get |
|---|---|---|
| Audi main dealer | £120–£200 per side | Genuine bulb and dealer labour |
| Independent garage | £70–£150 per side | Quality bulb plus £30–£60 labour |
| DIY | £40–£90 per side | The bulb alone - twenty careful minutes each side |
Typical UK prices for the Q5's D3S units. Unlike a £5 halogen, the bulb is the cost here - which makes the labour saving a smaller share, but £60–£120 per pair is still worth twenty minutes.
Why Only Philips or Osram - No Exceptions on Xenons
Two companies make virtually every legitimate D3S bulb: Philips and Osram, £40–£90 each. The £15 marketplace xenon is a different product wearing the same base - inconsistent arc position (scattering glare at oncoming traffic), rapid colour shift, and worst of all, strike voltages that stress the ballast. The ballast is the £200–£400 module bolted to the headlight; killing one to save £30 on a bulb is the worst trade in car electrics. Genuine pairs also age together, keeping colour matched for their whole life.
Common Mistakes With Xenon Bulbs
- Working with the system live. A xenon igniter generates around 25,000 volts to strike the arc. Lights off, ignition off, and give the system a few minutes to discharge before fingers go near the back of the unit - this is not halogen territory.
- Touching the glass. Skin oils create hot spots on the quartz envelope. Handle by the base only; if you do touch it, clean with isopropyl alcohol before fitting.
- Forcing the bayonet seat. The D3S seats and locks in one orientation. Force means misalignment - and a misaligned arc throws glare that fails MOTs and blinds oncoming drivers.
- Replacing one side only. Colour and output mismatch, guaranteed. Bulbs age as a pair; replace them as a pair.
- Condemning the bulb when the ballast is dying. A light that cuts out after warm-up, or flickers intermittently, is often the ballast or igniter. If a known-good bulb behaves the same in that side, stop buying bulbs.
Related Headlight Faults on the Q5
Xenon systems carry MOT-relevant hangers-on: the headlamp washers must work if fitted (a stuck washer jet is a fail), and the automatic level sensor on the suspension keeps the beam out of oncoming eyes - a Q5 sitting nose-high with a dead sensor will fail on aim. If a fresh bulb still flickers or cuts out, the ballast is the next suspect, and swapping the known-good bulb between sides is the free diagnostic that proves it. Headlight aim and condition sit near the top of UK MOT failure statistics - the MOT failures guide covers what the tester checks, and the symptom finder handles any light symptom that does not match the bulb story.
Job Summary
What to expect on this job: