The pollen filter (cabin air filter) on the Range Rover Velar sits behind the glove box. Replacing it every 15,000–20,000 miles keeps allergens, dust and odours out of the cabin. The job involves dropping the glove box and opening a small trap door - no tools required, just a little patience with the glove box string.
Step-by-Step Guide
Shop Parts & Tools for This Job
As an Amazon Associate, Mr Auto Fixer earns from qualifying purchases. Prices and availability may vary.
Go to the Passenger Side
Open the passenger door and get access to the glove box. The cabin filter is located directly behind it on this side of the car.

Drop the Glove Box
Pull the glove box door down slightly. Inside the box, there are two small tabs - one on each side. Push both tabs inward simultaneously and the glove box will drop down further.

Turn Ignition On & Set Temperature to Low
Before opening the filter trap door, turn the ignition on and set the cabin temperature gauge to LOW. You'll see a small white actuator/flap is initially closed - setting it to low causes it to open, giving you full access to the filter housing behind it.

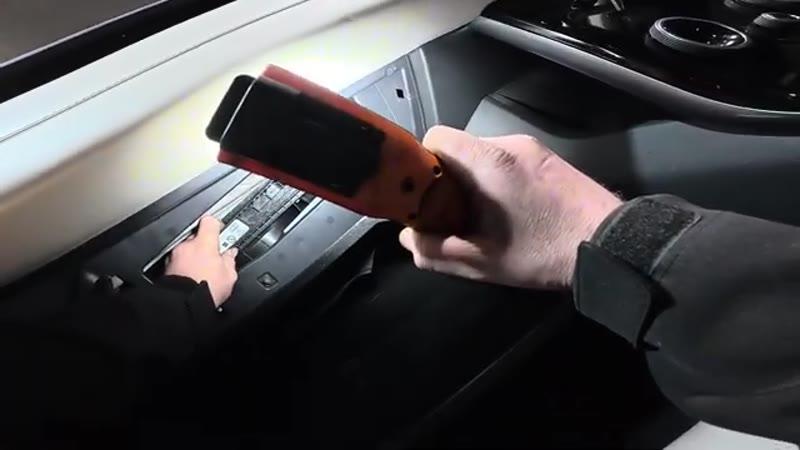
Open the Filter Trap Door
The trap door for the cabin filter is now visible. There are two small tabs, one on each side - squeeze them inward and pull the trap door out to reveal the pollen filter inside.

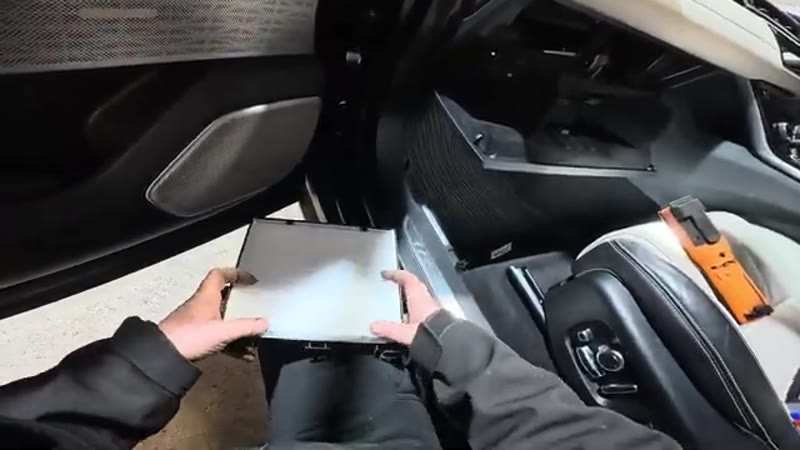
Remove the Old Filter
Slide the old pollen filter out. Note the airflow direction arrow on the old filter - it should be pointing upward. Dispose of the old filter.

Install the New Filter
Slide the new pollen filter in with the airflow arrow pointing upward. There are four small tabs on the bottom of the filter that locate into runners inside the housing - make sure these are seated correctly first before pushing the filter fully home.
Replace the Trap Door & Close the Glove Box
Pop the trap door back into position, pressing both tabs until they click. To close the glove box, use a trim tool or pick to hook the restraining string back over its peg - it's much easier this way. Then push the glove box tabs down slightly as you lift the box back up, and press it shut.
Want this guide offline - and 15 more like it?
Our PDF guide collection covers servicing, fault codes, buying a used car and more. Written by a qualified mechanic. Download once, use forever - no ads, no internet needed.
The £15 Job Hiding Inside the Premium Service Invoice
Somewhere on every Velar service invoice is a line for the cabin filter, priced like everything else with a Land Rover badge on the box. Here is the secret: it is the same ten-minute, no-tools job as on a Fiesta, and the filter itself is made by the same OE suppliers. The Velar's air quality systems - the ionisation, the purge modes - all depend on this one humble element, and it loads up like any other filter: a year of school-run traffic and it is grey, restricting airflow and feeding the climate system dirty air no ioniser can rescue.
Land Rover Dealer vs DIY Cost
| Who does it | Typical price | What you get |
|---|---|---|
| Land Rover main dealer | £80–£150 | The genuine-boxed filter, premium labour rate, a coffee in the lounge |
| Independent garage | £20–£50 | The same filter change without the lounge |
| DIY | £15–£30 | A quality carbon filter and ten careful minutes |
Typical UK prices for the Velar. Nothing about this job requires diagnostics, coding or a dealer - it is the most over-priced ten minutes in the Velar's service schedule.
Choosing the Filter for a Velar
Buy the activated carbon version, always, on this car - the Velar's climate system was designed around a carbon element, and the standard paper filter gives up the odour absorption the cabin was engineered to have. Mann, Mahle and Bosch all list carbon filters for the Velar at £15–£30; the identical element in Land Rover packaging is £35–£60. The one rule is fitment by registration: Velar model years differ in detail, and the premium cabin does not tolerate a filter flexed in to "sort of fit".
Common Mistakes on the Velar Filter Change
- Skipping the ignition-on, temperature-low step. It is in the guide for a reason - it positions the blend flap clear of the filter slot. Miss it and the new filter fouls the flap on the way in.
- Levering trim with a screwdriver. This interior is the most expensive thing you will touch all week. Fingers and a plastic trim tool only - one gouged panel costs more than a decade of filters.
- Forcing the trap door. The filter door releases squarely. Twist it off one corner and the hinge cracks, and a rattly filter door in a £50,000 cabin is a special kind of misery.
- Ignoring the airflow arrow. Arrow with the flow, as ever. The climate system's sensors notice restricted flow earlier on this car than most.
- Not vacuuming the housing. Clean slot, then clean filter - or the brand-new element starts life filtering last year's leaf litter from the inside.
If the Cabin Still Smells or Mists Afterwards
A musty note that survives the new filter is mould on the evaporator - an evaporator cleaning aerosol through the intake fixes it for £12, and it is worth doing at the same time on any Velar that has been running an old filter. Weak airflow with a fresh element points at the blower rather than the filter. And persistent windscreen misting usually means moisture already in the cabin: check the carpets and the scuttle drains before blaming the climate system. The symptom finder works through vent and misting symptoms step by step, and the UK servicing cost guide shows what the rest of that premium invoice should really cost.