Overview
A brake pedal that feels like you are pressing on a plank of wood is one of the more alarming driving experiences you can have. On the Mazda 3 2.2 SkyActiv diesel, this symptom almost always points to a failing vacuum pump - the component responsible for generating the engine vacuum that powers the brake servo. Without adequate vacuum, the servo cannot assist your braking effort, and the pedal becomes stiff, heavy, and slow to respond. Alongside the hard pedal, the ECU typically logs fault code P258B - Vacuum Pump Control Circuit A Range/Performance.
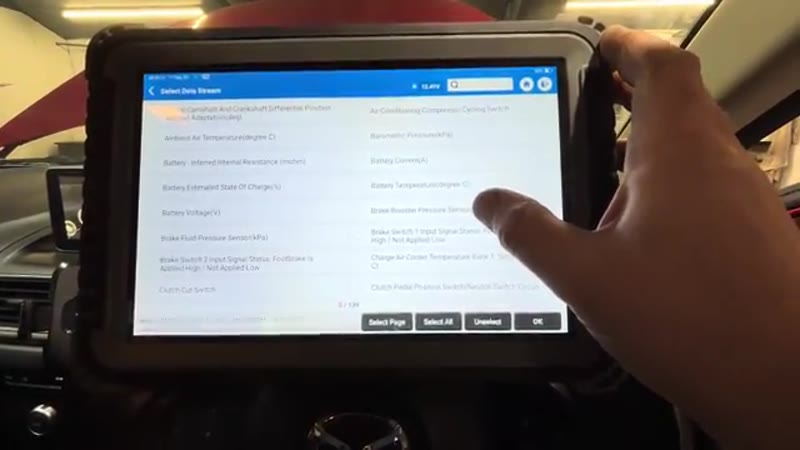
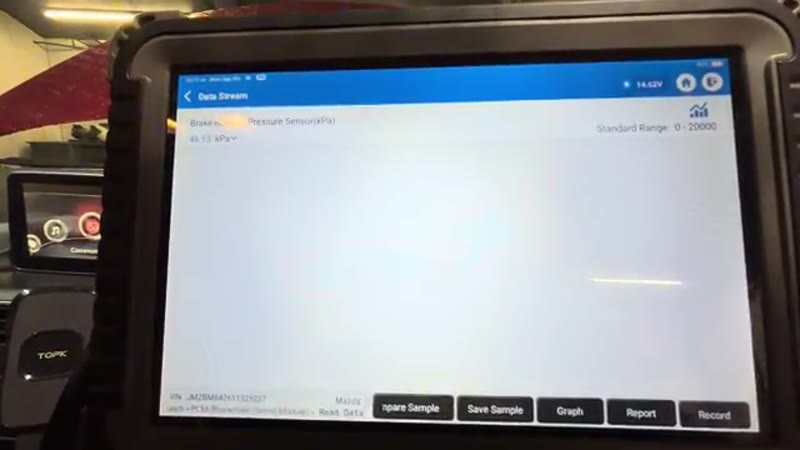
What makes the diagnosis particularly satisfying on this car is that you do not need to guess. An OBD scanner with live data capability lets you read the brake booster pressure sensor value directly. A healthy pump at idle should hold the reading comfortably below 10 kPa. If your reading is sitting above 15 kPa - or climbing even higher - the pump is failing and needs replacing. The replacement itself requires removing the battery for access, then the pump comes off with four 10mm bolts. It is rated Advanced because of the access work involved and the importance of getting the drive slot orientation correct on refitting, but anyone who has done engine work before will find it manageable.
Symptoms of a Failing Vacuum Pump
- Fault code P258B - Vacuum Pump Control Circuit A Range/Performance
- Hard, stiff brake pedal requiring much more effort than normal
- Brake booster pressure sensor reading above 15 kPa at idle on live data
- Slow vacuum recovery after pressing the brake pedal
- Engine management light on
- Pedal especially stiff on cold starts before vacuum builds
- Noticeably longer stopping distances
What You Need
Parts & Tools for This Job
As an Amazon Associate, Mr Auto Fixer earns from qualifying purchases. Prices and availability may vary.
Step-by-Step Guide
Scan for P258B and check brake booster live data
Connect your OBD scanner and pull any stored fault codes. You are looking for P258B - Vacuum Pump Control Circuit A Range/Performance. Once confirmed, switch the scanner to live data and find the brake booster pressure sensor reading. Start the engine and let it idle. On a healthy Mazda 3 SkyActiv diesel, this reading settles comfortably below 10 kPa within a minute or two of starting. A failing vacuum pump will hold the reading above 15 kPa - sometimes well above. As a secondary check, press the brake pedal firmly a few times and watch the reading: a healthy pump recovers rapidly after each press, a failing one is sluggish or does not recover at all. This data confirms the diagnosis before you spend a penny on parts.
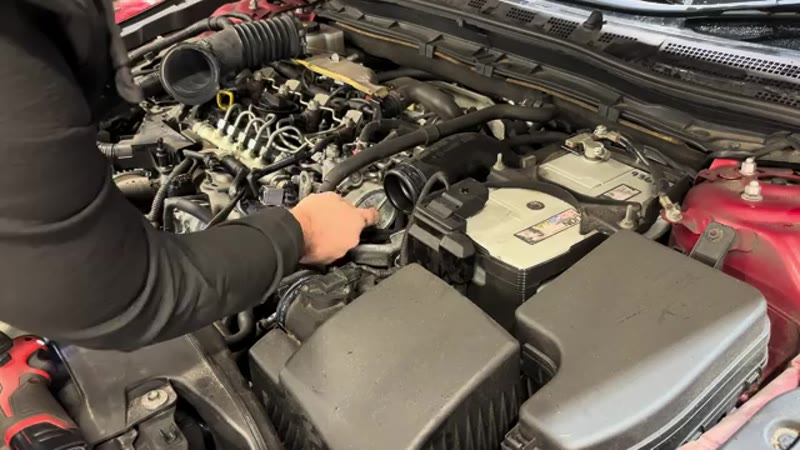
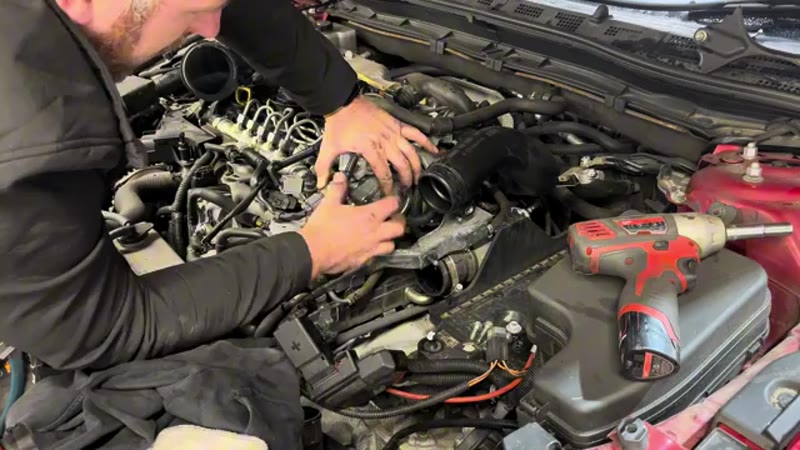
Remove the air intake pipe
Open the bonnet and locate the air intake pipe running from the airbox to the engine. Loosen the jubilee clip where the pipe meets the engine - a flat-blade screwdriver or Jubilee clip driver works well here. Unclip any breather hoses that are routed along the intake pipe and pull them free. Manoeuvre the pipe clear of the engine bay. This step is quick and creates the working space needed to get at the battery and the area around the vacuum pump on the side of the engine block.
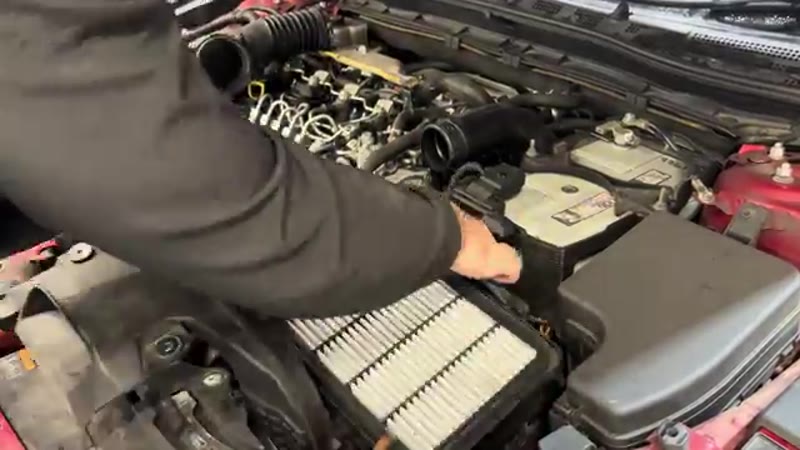
Remove the battery for access
On the Mazda 3 SkyActiv diesel, the battery sits directly in the area above and in front of the vacuum pump. Removing it is not optional - you cannot get the pump out cleanly with it in place. Disconnect the negative terminal first, then the positive. Remove the battery hold-down clamp bolt (usually 10mm) and lift the battery clear. Set it somewhere safe and out of the way. The space this opens up makes a real difference to the ease and safety of the rest of the job.
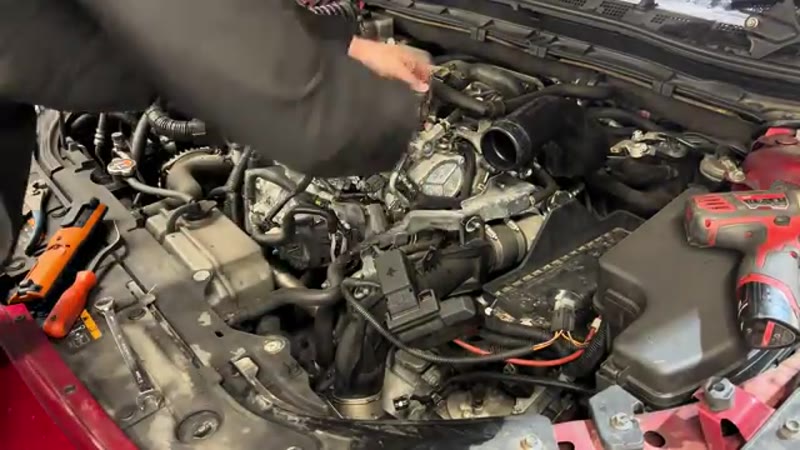
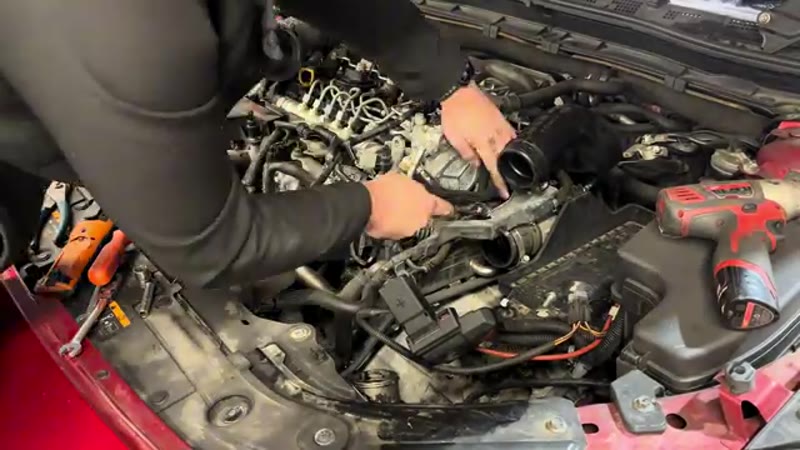
Disconnect the vacuum hose and remove the bracket
With the battery out, you can now clearly see the vacuum pump on the camshaft end of the engine. The large vacuum hose that feeds the brake servo connects directly to the pump - loosen its jubilee clip and pull the hose away from the pump outlet. If there are any other pipes or hoses connected to the pump body, release those too. Now locate the metal bracket bolted to the engine block adjacent to the pump. Remove the 12mm bolts securing this bracket and lift it away. Removing the bracket is necessary to create the clearance needed to withdraw the pump body.
Remove the four pump retaining bolts
The vacuum pump is secured to the end of the engine by four 10mm bolts. They are arranged around the circumference of the pump body - remove all four and keep them together. An extension bar may be needed for one or two bolts depending on the exact routing of surrounding components. With all four bolts removed, the pump is free - it will slide straight off the camshaft drive slot.
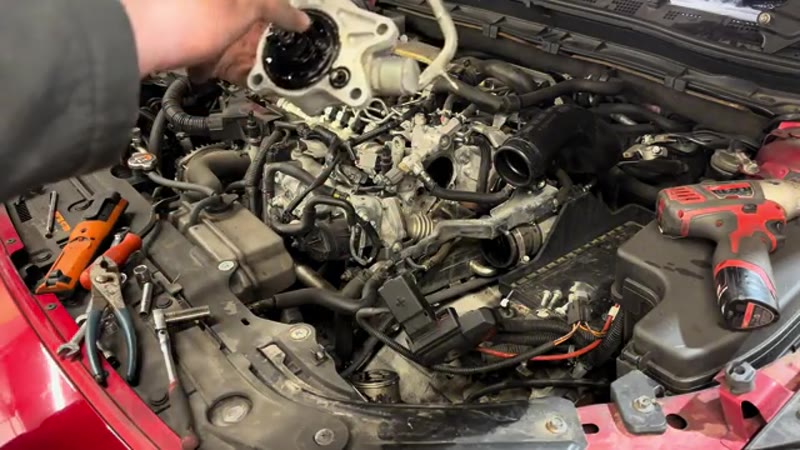
Remove the old pump and clean the mating face
Pull the old vacuum pump away from the engine. If the old gasket has bonded it slightly, a gentle rocking motion will break the seal - do not use a lever against the engine face. As the pump comes free, look at the back of it and note the orientation of the drive slot relative to the pump body. The new pump must go in at the same rotational orientation to correctly engage the camshaft drive. Once the pump is clear, use a clean rag or gasket scraper to remove all traces of the old gasket from the engine mating face, then wipe clean.
Fit the new pump with a new gasket
Place the new gasket onto the new pump - never reuse the old gasket. Align the drive tab on the back of the new pump with the camshaft drive slot, matching the orientation you noted earlier. If the drive tab does not align with the slot, the pump will sit proud of the mating face and will not bolt down flush - rotate the pump body slightly until it drops home properly. Push the pump firmly against the engine, check the gasket is lying flat with no gaps or kinks, then thread in the four 10mm bolts by hand. Tighten them in a cross pattern, pulling the pump down evenly, to avoid distorting the gasket.
Refit the bracket, hoses and battery
Refit the metal bracket and tighten the 12mm bolts securely. Reconnect the large vacuum hose onto the pump outlet and tighten the jubilee clip firmly - this connection is critical and must not leak. A loose hose here will mean a hard brake pedal despite the new pump. Reconnect any other hoses that were removed. Lower the battery back into its tray and refit the hold-down clamp, tightening the bolt to hold the battery securely. Reconnect the positive terminal first, then the negative.
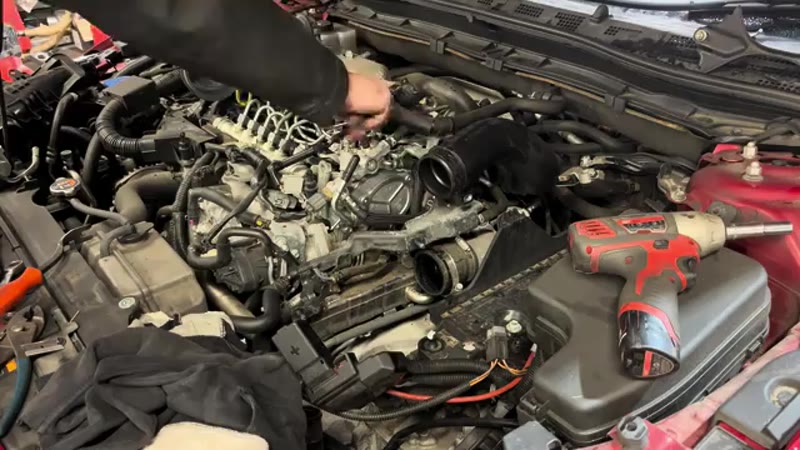
Refit the intake pipe, clear codes and verify with live data
Refit the air intake pipe and tighten the jubilee clip at the engine end. Reconnect any breather hoses. Start the engine and let it idle for a couple of minutes. Connect the OBD scanner, clear the P258B fault code, and switch to live data to monitor the brake booster pressure sensor value. With a healthy new pump fitted, the reading should settle at around 7–8 kPa at idle - a clear improvement from the 15 kPa or above that triggered the fault. Press the brake pedal several times and confirm the reading recovers quickly. The pedal should now feel normal - light and progressive. Road test the car and rescan to confirm the code has not returned.
Mr Auto Fixer Shop
Diesel Car Troubleshooting Guide
The Diesel Car Owner's Troubleshooting Guide covers the most common diesel faults - DPF issues, injector problems, vacuum systems, EGR faults - written by a professional mechanic with over 20 years on diesel engines.
Why the SkyActiv Diesel's Vacuum Pump Fails
Because a diesel generates no useful manifold vacuum, the Mazda 3's 2.2 SkyActiv-D drives a dedicated vane pump to feed the brake servo - and those vanes, running in a thin oil film off the camshaft, wear with every mile. On this engine the pump is a recognised wear point from around 90,000 miles, and it usually tells you twice: first a light rattle or tick from the pump end of the cam cover, then a brake pedal that needs noticeably more shove, especially in the first seconds after a cold start before oil reaches the pump. Because the pedal stiffens over months, owners recalibrate without noticing - the passenger who says "your brakes feel heavy" is often the actual diagnosis.
Treat it with braking-system urgency: a servo without vacuum leaves you with unassisted brakes that will technically stop the car, but with stopping distances from another century.
Mazda Dealer vs DIY Cost
| Who does it | Typical price | What you get |
|---|---|---|
| Mazda main dealer | £400–£600 | Genuine pump at dealer rates |
| Independent garage | £250–£400 | OE-quality pump fitted |
| DIY | £60–£120 | The pump and gaskets, 2-3 careful hours |
Typical UK prices for the 2.2 SkyActiv-D. The SkyActiv engine bay is tidier than most diesels - the access is fiddly rather than brutal.
Choosing the Pump
The 3's pump is a Japanese OE component, and the sensible sources are the genuine Mazda part (£150–£250) or an OE-equivalent from Pierburg or the Japanese OEM channel at £60–£120 - Blue Print catalogues these applications well in the UK. The marketplace £35 pump is the same false economy as any braking component: shed vanes go straight down the vacuum line toward the servo. Fit the new gasket and O-rings supplied, and renew the servo hose clips while everything is apart.
Common Mistakes on the Mazda Pump Job
- Skipping the confirmation test. Engine idling, crack the servo hose at the pump: strong steady suction means the pump is fine and your hard pedal is a hose or servo fault. Two minutes here saves a mis-aimed £100.
- Forcing the pump off its dowels. It sits located on the cam drive; lever it squarely or the alloy flange cracks - and cracked flanges leak oil onto the exhaust side.
- Misengaging the cam drive on refit. The drive coupling must seat by hand before any bolt turns. Pulling it home on the bolts is how castings break on this job.
- Reusing gaskets and rings. The pump seals oil as well as vacuum - old seals weep onto a hot engine, and the burning-oil smell gets blamed on everything else first.
- Driving off without the servo check. Pump the dead pedal five times engine-off, hold, then start: the pedal must sink as assistance arrives. If it does not, stop - literally.
Related SkyActiv-D Checks While You Are There
The 2.2 SkyActiv-D is a strong engine with a couple of known personality traits worth checking while the covers are off: keep the oil level religiously at the mark (these can suffer oil dilution from regenerations, and a rising dipstick level is diesel in the oil - change it early), and glance at the vacuum hose run for oil traces that would mean the pump seal had been weeping before it failed. A hard pedal with a healthy pump means servo or hose - cheaper than the pump, and the symptom finder confirms which before you order. For the wider diesel-ownership picture on short-trip driving, the DPF problems guide applies to this engine as much as any.
Verdict
The vacuum pump replacement on the Mazda 3 SkyActiv diesel is one of those jobs where the live data diagnosis makes all the difference - you walk into it knowing exactly what is wrong, which gives you confidence throughout. The battery has to come out for access but that is a 10-minute task, and once you are past that the pump itself is held on by four bolts. Get the drive slot orientation right when fitting the new pump, torque everything evenly, and the result is immediate - a soft, progressive brake pedal and a clean scan. The cost difference between DIY and a garage for this job is substantial.