Strut removal is fine for a careful beginner; the compressed spring is not. The spring swap is the step to either respect with proper compressors or hand to a garage for a few pounds - a spring let go in the wrong order is the one component on a car that can genuinely hurt you.
Overview
A leaking front shock absorber on the Fiat 500 2008 causes excessive body movement and a failed MOT. The procedure involves removing the anti-roll bar drop link, the two lower hub bolts and the top mount nut before the strut and spring assembly can be removed.
A spring compressor is required to transfer the spring and top mount to the new shock absorber.
When You Need This Job
Oily residue visible on the shock absorber body
Excessive bouncing or poor body control
Knocking from the front suspension over bumps
MOT failure or advisory on shock absorber condition
⚠ Handle the spring with careAlways use a proper spring compressor. A spring under compression stores enormous energy. Never remove the top nut without the spring fully compressed.
Tools You'll Need
17mm socket (wheel nuts)
19mm socket (top mount nut)
Mole grips
Wire brush
Spring compressor
ABS sensor clip removal tool or flat blade
Step-by-Step Guide
01
Remove the wheel
Undo the 17mm wheel nuts and remove the front wheel to expose the shock absorber assembly.
02
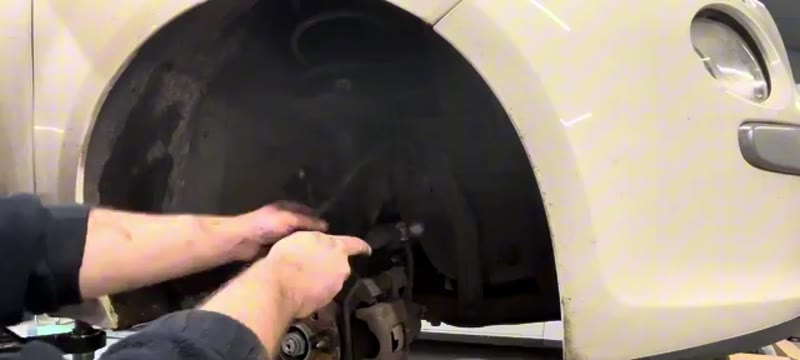
Unclip the ABS sensor wire and brake hose
Unclip the ABS sensor wire from its holder on the shock body and unclip the brake hose. Move them out of the way so they do not get damaged when the shock is removed.
03
Remove the anti-roll bar drop link
Undo the drop link nut. If the ball joint spins use mole grips on the back of the link to hold it still.
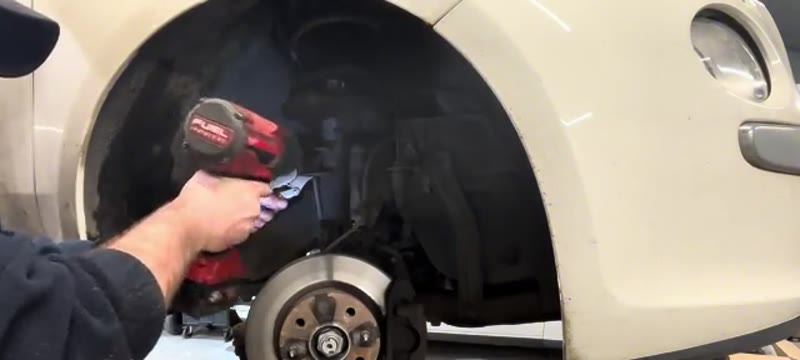
04
Remove the two lower hub bolts
Two bolts pass through the bottom of the shock absorber into the hub. These may be corroded - use hand tools and take care with the threads. Clean them up with a wire brush before attempting removal.
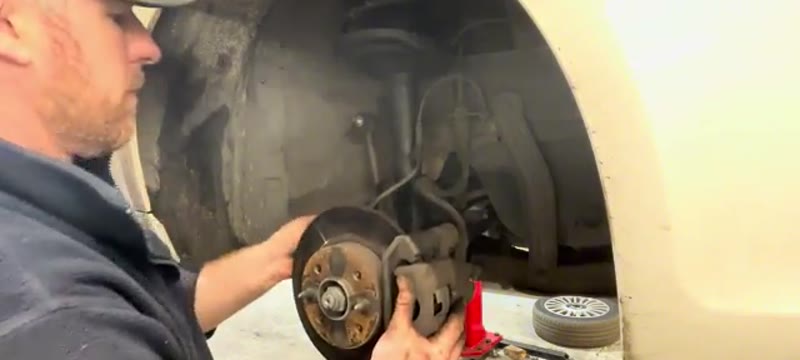
05
Push the hub away and free the shock
With the lower bolts out push the hub forward slightly. The shock absorber can now be moved away from the hub.
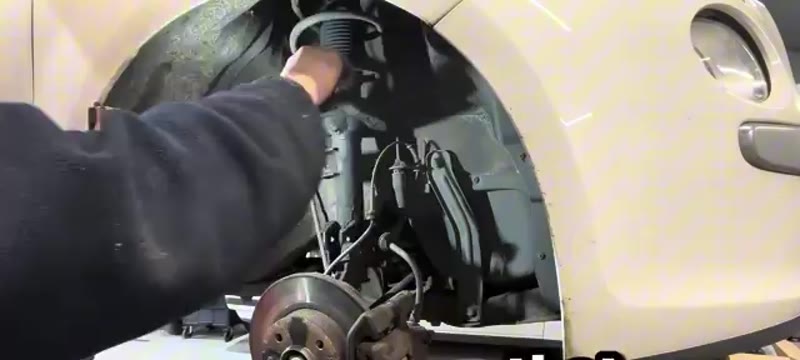
06
Remove the top mount nut with a 19mm socket
With the car back on the ground locate the top of the strut tower in the engine bay. Undo the 19mm nut. The shock absorber assembly can now be lifted out from below.
07
Compress the spring and swap the shock
Clamp the spring in a spring compressor. With the spring compressed undo the top nut. Remove the top mount, collar and spring. Fit the new shock into the spring ensuring it locates in the bottom recess. Refit the top mount and new nut.
08
Refit in reverse order
Feed the new strut assembly back into the strut tower and start the top nut. Line up the lower mounting holes, insert the bolts and tighten. Refit the drop link. Refit all clips. Torque the top nut. Refit the wheel.
Torque Specifications
Component
Torque
Top mount nut (19mm)
50 Nm
Lower hub bolts
85 Nm
Wheel nuts
98 Nm
Replace top mount at the same time
While the shock is out it costs very little to fit a new top mount. These wear at a similar rate to the shock absorber and save doing the job again.
Our PDF guide collection covers servicing, fault codes, buying a used car and more. Written by a qualified mechanic. Download once, use forever - no ads, no internet needed.
A shock absorber fails so gradually that your hands and backside recalibrate to it week by week: the 500 gets bouncier, nose-divey under braking and fidgety over crests, and because the change arrives over two years, nobody notices until an MOT tester finds the leak or a passenger asks why the car floats. Shocks on a town-driven 500 are typically tired by 60,000–80,000 miles - short-wheelbase city cars work their dampers constantly - and a visibly leaking shock is an MOT failure. The self-test that costs nothing: push each corner down hard and release; more than one-and-a-half bounces means the damper has left the conversation.
Worn shocks are a stopping-distance issue, not a comfort issue: a wheel that is bouncing is a wheel not braking. That is why testers care.
Garage vs DIY Cost
Who does it
Typical price
What you get
Fiat dealer
£250–£400
Genuine shock fitted, per side
Independent garage
£180–£300
Quality shock fitted, per side
DIY
£40–£80 per shock
Bilstein, KYB, Monroe or Sachs unit and a careful afternoon
Typical UK prices for a front shock on the 500. Always replace in axle pairs - one new damper next to one dead one gives a car that corners differently left and right.
Choosing Shocks for a 500
Sachs and Magneti Marelli supplied originals for the 500; Bilstein B4, KYB and Monroe are equivalent-or-better replacements in the £40–£80 bracket. The choice that actually matters is condition-matching: if the springs and top mounts are original at 80,000 miles, budget for top mounts and bump stops at the same time (£15–£25 a side) - fitting a new damper under a collapsed top mount rattles from day one and gets the new part blamed. The £18 marketplace shock is a comfort-and-safety gamble with no upside; damping is the whole job of the part.
Common Mistakes on the Shock Job
Disrespecting the coil spring. On strut-type fronts, the spring is compressed with proper clamped compressors before anything releases - a spring let go by accident carries genuinely lethal energy. Cheap rusty compressors are the one tool never to economise on.
Holding the piston rod with mole grips. The chromed rod is the sealing surface. Grip marks tear the seal and the new shock leaks within weeks - use the flats or hex provided.
Torquing the top nut with a rattle gun. It spins the rod, ruining the internal valving. Counter-hold and torque by hand as the guide shows.
Replacing one side only. Uneven damping across an axle upsets braking stability - always pairs.
Ignoring the top mount and bump stop. Fifteen quid of rubber now, or the whole strut apart again in six months when the clonk starts.
Related Suspension Faults on the 500
Before condemning the shocks, be sure the symptom is theirs: a knock over bumps is more often the drop links or the lower wishbone bushes; a creak on full lock is top mounts; wander with even tyre wear is tracking. Oil streaks down the damper body, a bounce that will not settle, and uneven scalloped tyre wear are the shocks' own signatures. With the strut out, check the spring for cracked coils (500 springs snap their bottom coil quietly) and the flexi hose bracket that rides on the strut. The symptom finder tells the front-end noises apart, and the UK suspension guide covers the theory in plain English.
Quick Stats
Difficulty
Intermediate
Vehicle
Fiat 500 2008
Time
1.5–2 hrs
Parts Cost
£40–£120
Common Questions
FAQ
Yes, if you respect the spring. The strut comes out as an assembly after the drop link, two lower hub bolts and the top mount - that part is honest DIY. Compressing the spring to swap it onto the new shock needs proper spring compressors used carefully; if that step worries you, remove the strut yourself and have a garage swap the spring over for a few quid.
£180–£300 at a garage for a front shock on a 500 including the part. Quality shocks are £40–£80 each. Replace them in pairs across the axle - a new damper on one side and a tired one on the other makes the car unstable in an emergency stop.
One to two hours a side. Seized lower hub bolts are the usual delay on UK cars - soak them in penetrating oil the night before. The MOT-failing leak is cured the moment the new unit is in, but check the top mount bearing while it is apart; they are cheap and often worn too.
Sockets for the wheel nuts and the 19mm top mount, mole grips, a wire brush for the threads - and the one serious item, a proper spring compressor. Borrow or buy decent compressors; the cheap flimsy ones are the dangerous ones.
20+ Years ExperienceMOT TesterProfessional UK Mechanic
All guides on this site are written from real, hands-on experience - not copy-pasted from a manual. If I haven't done the job myself, it doesn't go on the site.