
The pollen filter on the Citroen DS3 is accessed from the engine bay, not the interior - slightly unusual. It sits behind a cover just to the right of the engine bay when standing at the front of the car. There are actually two filter sections: a larger main filter and a smaller secondary one that slides to the right.
On this 2012 DS3 neither filter had ever been changed. Both were severely contaminated. The procedure is simple once you know where to look and how the two-part filter fits together.
Why Change Your Pollen Filter?
On the Citroen DS3 the pollen filter - also called the cabin or air-con filter - cleans the air pulled into the cabin through the heater and ventilation. As the DS3 is so often a city car, that air carries a steady diet of traffic fumes, brake dust and pollen, all of which the filter has to trap before you breathe it.
A blocked filter is not just a comfort issue. It chokes airflow through the heater and vents, so the DS3's blower works harder, the windscreen is slow to clear, and the air conditioning loses its bite. On a DS3 that has never had the filter changed, a new one usually brings an instant lift - stronger flow, quicker demisting, and no musty whiff when you climb in.
Signs Your Pollen Filter Needs Replacing
- Reduced airflow from the vents even at full fan speed
- Musty or unpleasant smell when the heater or AC is switched on
- Increased allergy symptoms - itchy eyes or nose while driving
- Windscreen takes noticeably longer to demist than it used to
- Fan sounds louder than normal - working harder against the restriction
- Unable to confirm the filter has been changed in the last 12–15,000 miles
How Often Should You Change It?
Citroen suggests around every 12–15,000 miles or yearly, whichever lands first, though a DS3 living in town will block its filter sooner. The pollen filter is one of the items garages quietly skip to keep the service price down, so a used DS3 with thin history is very likely running on its first-ever filter - change it without waiting.
If your DS3 mostly does city miles, sits in queues, or runs the air conditioning a lot, swap the filter every year whatever the mileage says. Urban driving feeds in far more particulates and exhaust than open-road use, and that clogs the element much faster.
Standard vs Activated Carbon Filters
The DS3 takes one of two filter types. A standard particle filter traps dust and pollen with pleated paper or fibre, matching the basic original part. An activated-carbon filter adds a charcoal layer that also absorbs traffic gases and odours, which makes real sense for a car used in heavy town traffic. It is a few pounds dearer but the cabin air is clearly better, particularly on an older DS3.
Step-by-Step Guide
Shop Parts & Tools for This Job
As an Amazon Associate, Mr Auto Fixer earns from qualifying purchases. Prices and availability may vary.
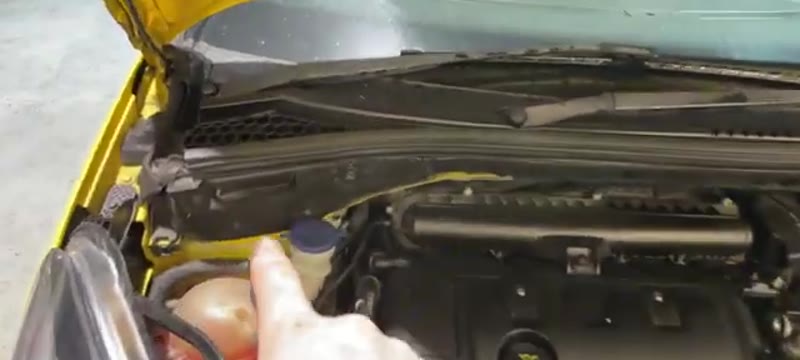
Open the Bonnet & Locate the Filter Housing
Open the bonnet (release from inside the car, then locate the secondary catch at the front grille and pull to one side). Put the bonnet stay in place. Look at the engine bay - towards the passenger side firewall you will see a small plastic cover. Pull this cover off to expose the black filter housing beneath it.
Open the Filter Housing Cover
The filter housing has a hinged or pull-down front cover. Pull it down or fold it towards you to open the access to the filters inside.
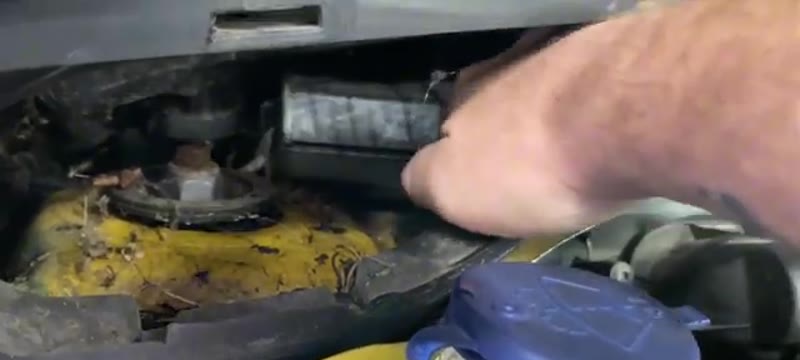
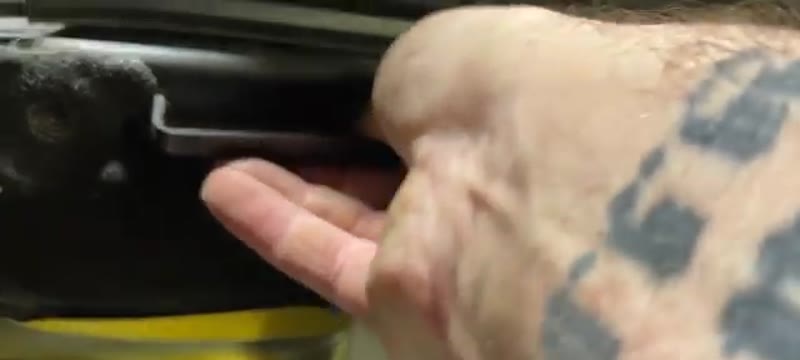
Remove Both Filter Sections
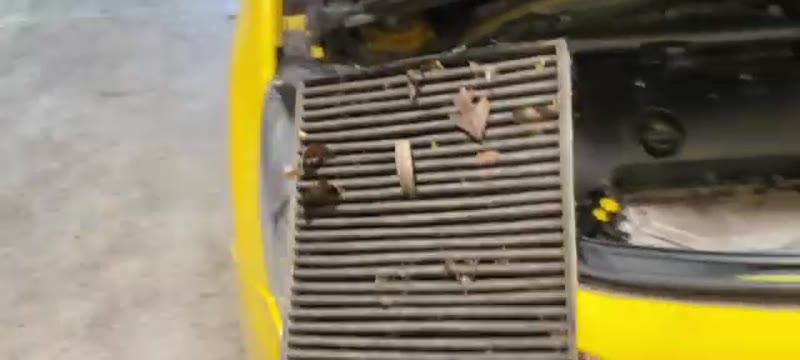
First reach in and pull out the larger main filter - it slides straight out. Then reach further in and to the right to find the smaller secondary filter element in its own slot. This one slides out to the left and then forwards. Both filters will be dirty if they have never been changed - dispose of both.
Fit the New Filters
Check the airflow direction arrow on both new filters. The smaller element goes in first - slide it into its slot on the right side and push it into position. The larger main element then slots in at the front. Both should sit flush and secure once correctly located.
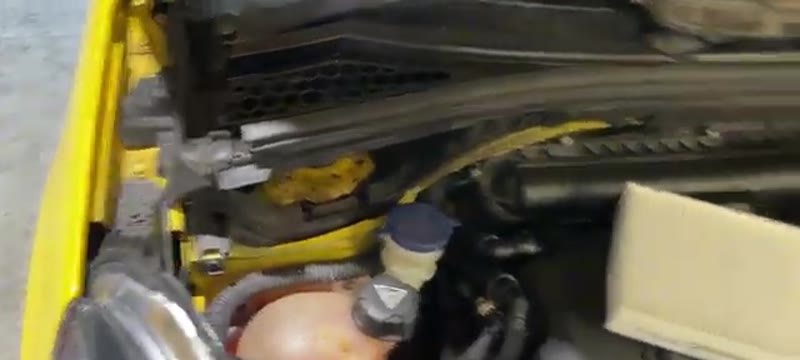
Close the Cover & Refit the Plastic Cover
Fold or push the filter housing cover back into its closed position, making sure it clips in securely on both sides. Refit the outer plastic cover over the top. Close the bonnet. Done.
Want this guide offline - and 15 more like it?
Our PDF guide collection covers servicing, fault codes, buying a used car and more. Written by a qualified mechanic. Download once, use forever - no ads, no internet needed.
Why the DS3 Filter Gets Forgotten (and What That Costs)
The DS3's pollen filter lives in the engine bay under the scuttle rather than behind the glove box, and parts that are out of sight get skipped at home services - plenty of DS3s are running around on filters four or five years old. A city car by design, the DS3 spends its life in exactly the traffic that loads a filter fastest, and its two-piece filter design means a bodged previous change (one section seated, one folded) is surprisingly common. If you have just bought one, assume the filter is ancient until you have seen it.
Garage vs DIY Cost
| Who does it | Typical price | What you get |
|---|---|---|
| Citroën/DS dealer | £40–£80 | Genuine filter, booked labour slot |
| Independent garage | £20–£50 | The same job - the fee is really for knowing where the filter hides |
| DIY | £10–£20 | Quality two-piece filter set, no tools, ten minutes |
Typical UK prices for the DS3. Once you know the engine-bay location trick from this guide, the labour value of this job is close to zero.
Genuine Citroën Prices vs Aftermarket
The two-piece filter set is made for PSA by the usual OE names - Mann, Purflux (the French OE supplier, often the exact part in the Citroën box) and Bosch - so a branded aftermarket set at £10–£20 matches the genuine one at £25–£35.
If the Symptoms Survive the New Filter
A DS3 that still smells musty after a fresh filter has the smell living on the evaporator - an aerosol evaporator cleaner through the intake fixes it for £10–£15. Weak airflow with a new filter is the blower motor or resistor, a known wear item on these. And if the service reminder is what prompted the job, our Peugeot/Citroën service light reset guide clears it in under a minute. For anything else the vents are doing, start at the symptom finder.
Job Summary
Common Mistakes to Avoid
The number-one error is fitting the filter the wrong way round. Check the airflow arrow printed on the edge of the new filter and line it up with the direction air flows into the cabin. Fitted backwards it filters poorly and can let the media buckle against the housing over time.
The second frequent mistake is not seating the cover fully. On the DS3 an unclipped cover gives a whistle or draught from behind the dash and softer airflow at the vents. Give it a firm push and confirm each clip has locked before finishing.
Frequently Asked Questions
Will changing the pollen filter improve my air conditioning performance?
Yes, frequently by a wide margin. A clogged filter cuts the amount of air the DS3's system can shift, so it cools and heats the cabin slowly. Fit a new filter before booking an air-con regas - on a long-neglected DS3 the airflow improvement alone is often dramatic.
Can I just clean and reuse the old filter?
Not properly. Tapping or blowing a filter through only frees the surface; the media stays loaded with fine soot, pollen and damp that cannot truly be cleaned. Given how cheap DS3 filters are, reusing a dirty one is a false economy - always fit new.
My car doesn't have air conditioning - does it still need a pollen filter?
Yes. The pollen filter belongs to the fresh-air ventilation, not the air conditioning, so even a DS3 without AC draws its cabin air through it. A blocked filter still leaves weak vents and can grow mould in the ducting, so it should be replaced on the usual schedule regardless of whether the car has air conditioning.
What happens if I leave a blocked pollen filter in too long?
Ignore it long enough and the trapped airflow forces the blower motor to run under load, shortening its life. A saturated filter also lets mould and bacteria take hold in the heater box behind it, causing a stubborn musty smell that is hard to cure without cleaning or replacing the box - a far bigger job than the quick filter swap.