
The pollen filter (also called a cabin air filter) on the 2013 Nissan Qashqai is one of the most overlooked service items - and one of the easiest to change yourself. No tools required, it takes around five minutes, and a fresh filter makes a noticeable difference to in-car air quality, heating and air conditioning efficiency.
The filter is located behind the passenger side dashboard and is accessed by removing two simple trim panels. On older vehicles that have never had the filter changed, you'll often find it completely clogged - which reduces airflow through the cabin significantly.
Signs Your Pollen Filter Needs Changing
- Reduced airflow from the vents even on full fan speed
- Musty or unpleasant smell when heater or air con is on
- Increased dust or pollen inside the cabin
- Air con seems less effective than usual
- Filter hasn't been changed in over 12 months or 12,000 miles
- No record of filter change in service history
What You'll Need
Step-by-Step Guide
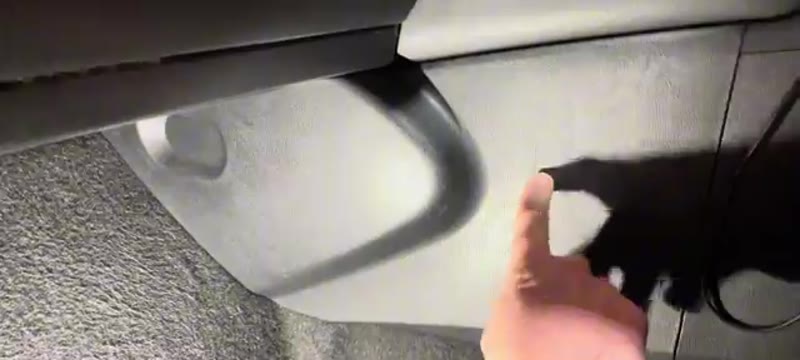
Open the Passenger Door & Locate the Trim Panel
Open the front passenger door and get down into the passenger footwell. On the left hand side of the footwell you'll see a plastic trim panel. This is held on with push clips - no tools needed. Simply grip it and pull it firmly towards you and it will pop free. Set it to one side.
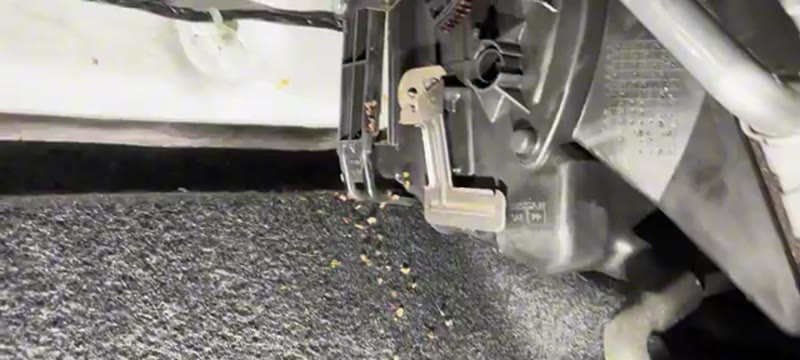
Remove the Filter Access Panel
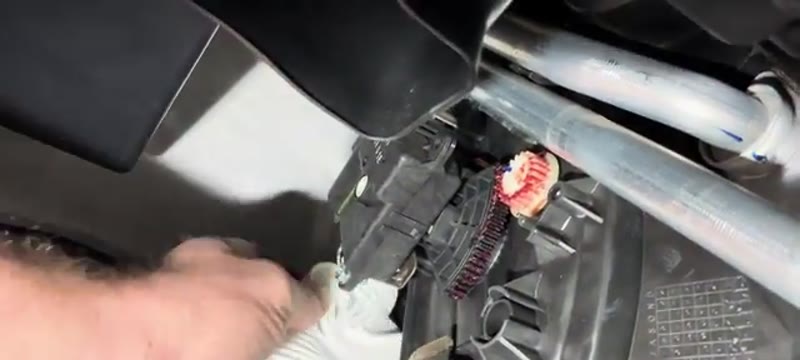
With the trim panel removed you'll now see a smaller rectangular access panel behind it. This has a small clip at the bottom - press or pull the clip downwards to release it, then put your finger behind the panel and pull it towards you. It's located at the top by a small tab so once the bottom clip releases you can wiggle it downwards and away. This reveals the pollen filter housing directly above.
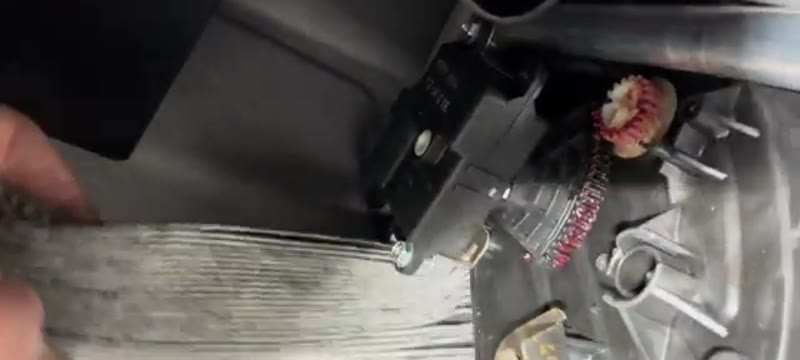
Remove the Old Pollen Filter
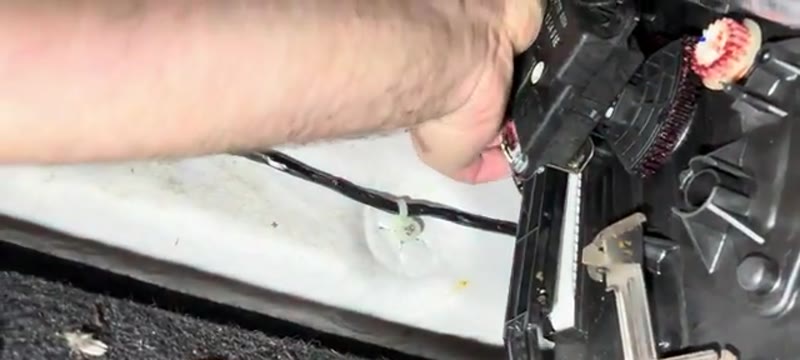
You can now see the pollen filter sitting in its housing above. Get your fingers in and start to pull the filter out - you'll notice there is a wiring loom and a sensor plug running across the top of the filter housing. Be careful not to snag or break the sensor as you pull the filter out. Work the filter underneath the wiring carefully, pulling it out at an angle. On a neglected vehicle the filter will likely be very dirty - have your hoover ready.
Check the Airflow Direction on the New Filter
Before fitting the new filter, look for the airflow direction arrow printed on the side of the filter. On most vehicles air flows into the cabin from the front of the car, so the arrow should point inward (towards the back of the car). Check the arrow direction on the old filter too - assuming it was fitted correctly - to confirm orientation before inserting the new one.
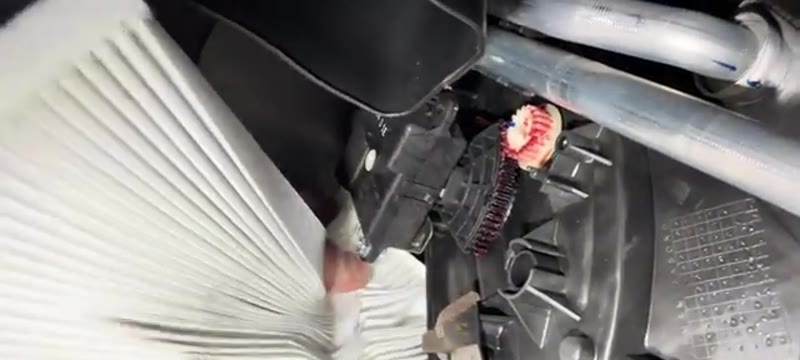
Fit the New Filter
Slide the new pollen filter into position, feeding it carefully underneath the wiring loom just as you did during removal. Be gentle around the sensor. Once the filter is in the correct orientation, push it fully into the housing - it will spring into place and locate correctly at both the top and bottom of the housing.
Refit Both Panels & Hoover Up
Slide the access panel back up into position, locating the tab at the top first, then pushing the bottom clip back in until it clicks. Then refit the larger footwell trim panel by lining it up and pressing it firmly back onto its clips. Finally hoover up any debris or dust that fell out of the old filter during removal - your customer will appreciate a clean footwell!
Parts & Tools for This Job
ⓘ As an Amazon Associate, Mr Auto Fixer earns from qualifying purchases. Prices and availability may vary.
Want this guide offline - and 15 more like it?
Our PDF guide collection covers servicing, fault codes, buying a used car and more. Written by a qualified mechanic. Download once, use forever - no ads, no internet needed.
Why the Qashqai Filter Clogs Fast (and How Often to Change It)
The Qashqai practically invented the urban crossover, and urban is the operative word for its filter: idling in traffic feeds the intake concentrated soot, brake dust and pollen at exactly windscreen height. Nissan's schedule calls it annual, and a town-driven Qashqai genuinely needs that - by twelve months the element has gone from white to the colour of a teabag. The awkward-kneeling access on this car (down in the passenger footwell rather than behind the glove box) is exactly why so many skip it at home services, and why so many Qashqais drive around with vents that smell like a wet dog.
Garage vs DIY Cost
| Who does it | Typical price | What you get |
|---|---|---|
| Nissan main dealer | £50–£90 | Genuine filter and a booked labour slot |
| Independent garage | £20–£50 | The same five-minute job with a quality filter |
| DIY | £8–£16 | A branded carbon filter and one kneel in the footwell |
Typical UK prices for the 2013-era Qashqai. Once you have found the access panel - the only hard part - the labour content of this job is a few minutes.
Common Mistakes on the Qashqai Filter Change
- Breaking the trim panel clips. The footwell panel pops off its clips with a firm, square pull. Peeling it from one corner levers the clip mounts off the back of the panel - and it never sits flush again.
- Crushing the filter on the way in. The access angle is tight and the filter flexes to enter, as the guide shows - but flex is not fold. A creased pleat is a permanent leak path.
- Fitting it upside down. Check the airflow arrow before it disappears into the slot; on this car you cannot see the filter face once it is seated.
- Not hoovering the drop zone. Whatever fell out of the old filter is now in the footwell carpet and the housing mouth. Two minutes with the vacuum finishes the job properly.
- Giving up and paying £50. The whole battle is knowing where the panel is - and you now know. Everything after that is easier than topping up screenwash.
Related Qashqai Symptoms Worth Knowing
Qashqais are notorious among owners for misting windscreens, and a saturated pollen filter is the usual culprit - but if a fresh filter has not fixed it, check for damp carpets from blocked scuttle drains and take a look at the air recirculation flap, which can stick on these and keep the cabin breathing its own humidity. A vent smell that survives the filter change is evaporator mould; a £12 aerosol treatment cures it. And if the service reminder triggered this job, the Qashqai service light reset guide clears it in under a minute - or run any other symptom through the symptom finder.
Job Summary
What to expect on this job: