The pollen filter on the Ford Kuga is located in the passenger footwell behind the glove box. The glove box releases with two tabs, then a small filter cover plate is secured by two T15 Torx screws. Once those are out, the cover folds down and you have clear access to the filter. Replace every 15,000–20,000 miles or once a year.
How To Tell Your Pollen Filter Needs Changing
The Ford Kuga MK3 (2019–2023) hides a fairly big pollen filter behind the glove box, which means when it goes off, you really notice. The first sign on a Kuga is almost always a damp, musty smell coming through the centre and side vents when you fire up the climate control on a cold morning - bacteria and mould thriving on summer aircon condensate trapped in the media. Next is airflow: the Kuga's blower is a solid unit, so if you have to bump it to 3 or 4 just to feel air at the dash vents, you've got a restricted filter. Other signs are a windscreen that takes twice as long to demist as it used to, hayfever-style symptoms (itchy eyes, sneezing, congestion) that flare up only when you're driving, and a layer of fine black or brown dust collecting in the centre vent slats. The Kuga manual lists 20,000 miles, but in UK conditions - wet winters, pollen-heavy springs, motorway commutes - most filters are knackered by 12,000–15,000 miles or 12–24 months. If you drive in town traffic, park near trees, or carry kids and dogs, knock that down again. If you've ticked two or more of these signs, change the filter - it's a £10–£25 job that takes 10 minutes.
Common Symptoms of a Blocked Pollen Filter
- Musty, damp or "old gym kit" smell from the vents on AC startup
- Weak airflow even on max blower setting
- Windscreen demist takes far longer than it used to
- Hayfever-style symptoms appearing only when you're driving
- Black dust around the dashboard vent outlets
- Air conditioning seems to "lose power" - it can't push air through a blocked filter
DIY vs Garage Cost - UK 2026
An independent UK garage will charge £35–£60 for pollen filter replacement on a Ford Kuga MK3 - that covers the part and 0.3 to 0.5 hours of book labour. A Ford main dealer will quote £65–£105 because they fit a genuine Motorcraft part and book longer. The DIY part cost from a UK factor or Amazon: own-brand £8–£14, Bosch or Mann or Mahle £14–£25, and a genuine Motorcraft part is £25–£40. The labour difference is silly when you consider the job needs only a T15 Torx bit and 10 minutes. This is one of the best DIY money-savers on the Kuga, and you don't need any mechanical skill to do it - just patience to thread the two small screws back without dropping them in the footwell. A quality Bosch or Mann activated carbon filter performs identically to OE for half the price, and the Kuga housing is generous enough that aftermarket parts seat without fuss.
Step-by-Step Guide
Shop Parts & Tools for This Job
As an Amazon Associate, Mr Auto Fixer earns from qualifying purchases. Prices and availability may vary.
Go to the Passenger Side
Open the passenger door. The cabin filter is located in the HVAC housing behind the glove box. Open the glove box door fully.

Release the Glove Box
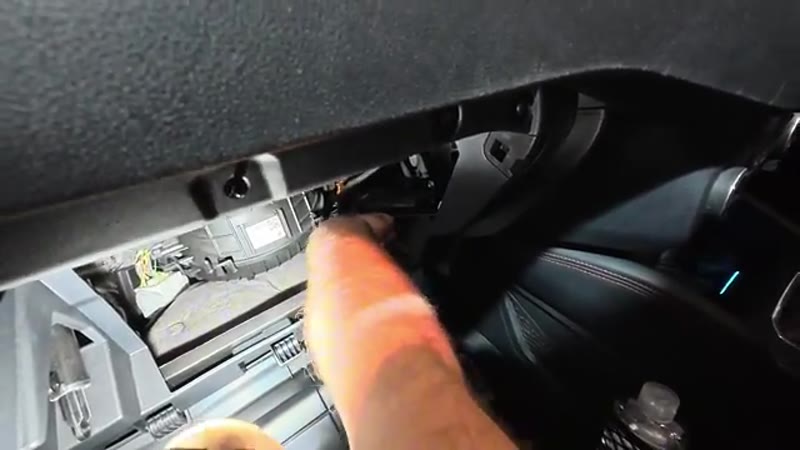
Inside the glove box, look for two release tabs - one on the side and one near the top. Push each tab inward to release the glove box. It will drop down out of the way, giving you access to the filter housing behind it.

Remove the Two T15 Torx Screws
With the glove box dropped, you'll see the pollen filter cover plate. It is held by two T15 Torx screws. Remove both screws carefully - they're small and easy to drop. Keep them safe.
Open the Filter Cover
With the screws removed, the cover plate has two push-tabs on each side. Press both tabs and the cover folds down, revealing the pollen filter inside.
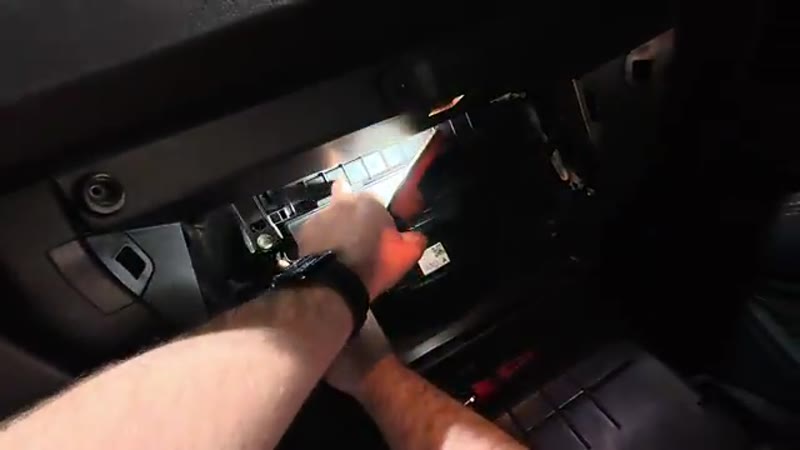
Remove the Old Filter
Slide the old pollen filter out. Note the airflow arrow - it points downward on this model. The filter will likely be dirty - that's normal.

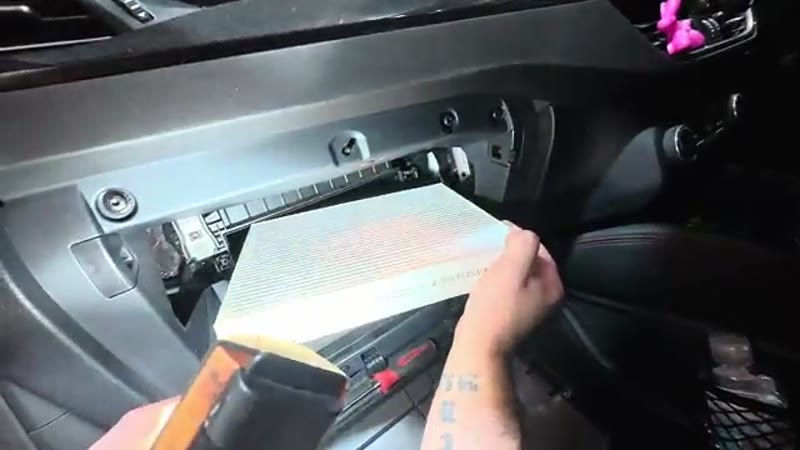
Fit the New Filter
Slide the new filter in with the airflow arrow pointing downward. It should be a snug fit. Once in, fold the cover back up and make sure the small locating tabs click into position before replacing the screws.
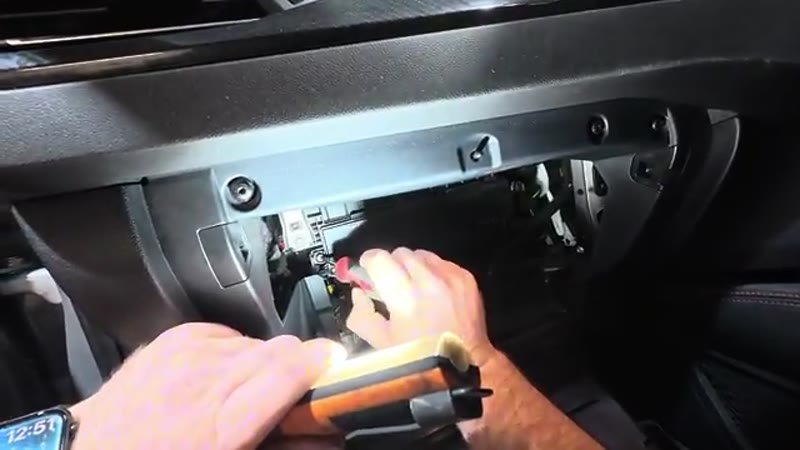
Refit the Two Torx Screws & Glove Box
Thread the two T15 Torx screws back in by hand first, then tighten. Then lift the glove box back up - the release tabs will click back into their locked position automatically as you push it shut.
Common Mistakes To Avoid
The Kuga MK3 pollen filter swap is a 10-minute job, but a handful of mistakes catch people out - and the two Torx screws make this one of the easier filter housings to get wrong. First - fitting the filter the wrong way around. The airflow arrow must point downwards into the heater box (the same way the old one was facing). If you can't see an arrow on the new filter, look at the OLD filter's dirty face - that's the air entry side, and the new one goes in the same orientation. Second - dropping the two T15 Torx screws into the passenger footwell when you take them out. The carpet swallows them and you'll be hunting with a torch for ten minutes; use a magnetic screwdriver tip or stick a small piece of tape over the screw head while you unscrew. Third - not seating the locator tabs on the cover plate before tightening the screws. If the plate isn't sitting flush, you can crack it by forcing the screws home. Fourth - pinching the filter's foam seal between the housing and cover plate so air bypasses the filter entirely. Fifth, specific to the Kuga - the cover plate has small plastic locator tabs that are fragile if the plate has been off a few times; ease the plate down gently rather than yanking it. Sixth - buying a cheap unbranded filter that's a few millimetres off the housing; the Kuga tray is fairly tight at the front edge. Take the old filter out, look at it next to the new one, fit the new one the same way round. That's the whole job.
Want this guide offline - and 15 more like it?
Our PDF guide collection covers servicing, fault codes, buying a used car and more. Written by a qualified mechanic. Download once, use forever - no ads, no internet needed.
Why Kuga Filters Load Up Quickly
The Kuga is a family SUV that does a bit of everything - school run, supermarket, motorway - and mixed use is deceptively hard on a cabin filter. Town miles feed it soot and brake dust, motorway miles pull in high volumes of air (and everything in it) for hours at a time, and the diesel versions parked nose-to-tail in traffic inhale the particulates of every DPF regeneration around them. Ford schedules the filter annually, and on a Kuga that has done a British autumn - the scuttle fills with leaf fragments that end up in the filter - the old element usually looks like it earned retirement.
Genuine Ford vs Aftermarket (and the Carbon Upgrade)
The Kuga's filter is made for Ford by Mann, Mahle and Bosch, and their own-brand versions at £10–£20 are the identical element to the genuine part at £25–£35. If anyone in the car suffers with hay fever or you drive in traffic daily, the activated carbon version is the meaningful upgrade - £5–£8 more, and it absorbs the exhaust fumes and odours a standard paper element ignores. Fit whichever grade you choose annually and the cabin air stays better than the air outside it.
Related Faults on the Kuga's Ventilation System
If symptoms outlive the new filter, work outward. A musty smell that persists is evaporator mould - a £12 evaporator treatment aerosol through the intake cures it. Weak airflow on all speeds with a clean filter points at the blower motor; a blower stuck on one speed is the resistor pack. And the Kuga habit worth knowing: blocked scuttle drains on these can let rainwater find the cabin, so if the passenger carpet is damp, clear the drains under the scuttle trim before blaming anything else.
The filter is the easiest job on the car - if it has whetted your appetite, our UK servicing cost guide shows what else you can save by doing yourself, and the symptom finder handles any vent symptom that does not fit the filter story.